| Author |
Message |
PHOBoS

Joined: Jan 14, 2010
Posts: 5603
Location: Moon Base
Audio files: 705
|
 Posted: Thu Jan 30, 2014 12:00 pm Post subject:
Frankensynth Posted: Thu Jan 30, 2014 12:00 pm Post subject:
Frankensynth
Subject description: building a synth with leftovers |
  |
|
I have a box with old circuits, some are fully functional others are missing some parts (I suspect a lot you have a box like this), so I want to try if I can
make a synth using some of those circuits. A lot of them aren't directly audio related, but I have things like a light chaser which could easily be turned
into a sequencer by adding some potentiometers to the outputs. The LED matrix I used for the LED-O-SCOPE also came from that box.
One of the circuits is, or was, a 12 LED thermometer which was not much more then 1 chip, 2 trimpots, 2 resistors, an NTC and twelve LEDs. The
trimpots were allready missing and after doing a quick test I decided to just resolder the chip and plug it into my breadboard, instead of soldering
a wire to almost every leg.
The chip is a UAA180 12 LED bar driver, which is somewhat similar to an LM3914 but with 12 outputs which are connected to 3 groups of 4 LED's in
series. I could make some sort of voltage controlled sequencer out of it but that would require 12 pots and since the ouputs aren't simply on/off
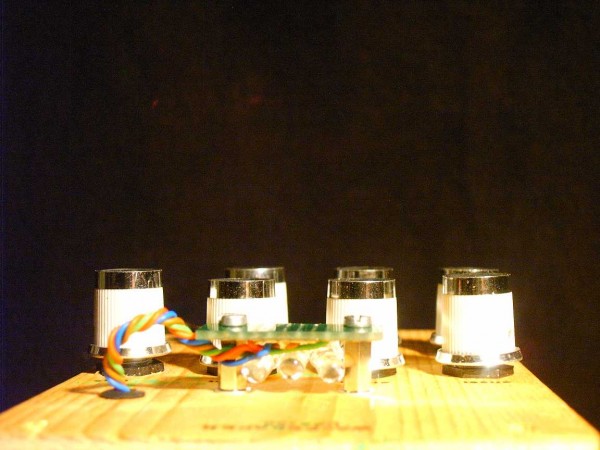
it's probably not so easy to do. Instead I tried if it would be useful as a waveshaper by connecting some resistors to the outputs and feeding it
with a triangle wave. Well, that actually works pretty good and by adjusting the range (Vref max) you get some very interesting effects.
I think it's probably similar to the 5-pulser, but I don't have one so can't say for sure and this one probably has a lot more steps.
I did start on adding a CV mixer but without having idea of what the voltage of the input signals will be that's rather pointless. And with just
two attenuators on the inputs (Vref max, Vcontrol) it actually works pretty good. Here's a screenshot from a test with a trianglewave input (I
thought it was only a positive voltage but turned out to be negative aswell, glad I didn't fry the chip with that  ) )
you can hear it in action in Alien Spoonbending.
| Description: |
| UAA180 waveshaper test with trianglewave input |
|
| Filesize: |
54.98 KB |
| Viewed: |
777 Time(s) |
| This image has been reduced to fit the page. Click on it to enlarge. |

|
| Description: |
|
| Filesize: |
43.91 KB |
| Viewed: |
1124 Time(s) |
| This image has been reduced to fit the page. Click on it to enlarge. |
|
_________________
"My perf, it's full of holes!"
http://phobos.000space.com/
SoundCloud BandCamp MixCloud Stickney Synthyards Captain Collider Twitch YouTube |
|
|
Back to top
|
|
 |
PHOBoS
Joined: Jan 14, 2010
Posts: 5603
Location: Moon Base
Audio files: 705
|
|
|
Back to top
|
|
|
PHOBoS
Joined: Jan 14, 2010
Posts: 5603
Location: Moon Base
Audio files: 705
|
| Posted: Fri Jan 31, 2014 1:14 pm Post subject:
|
|
|
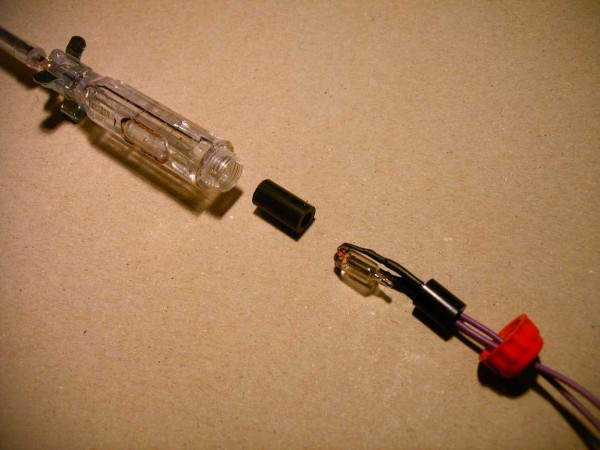
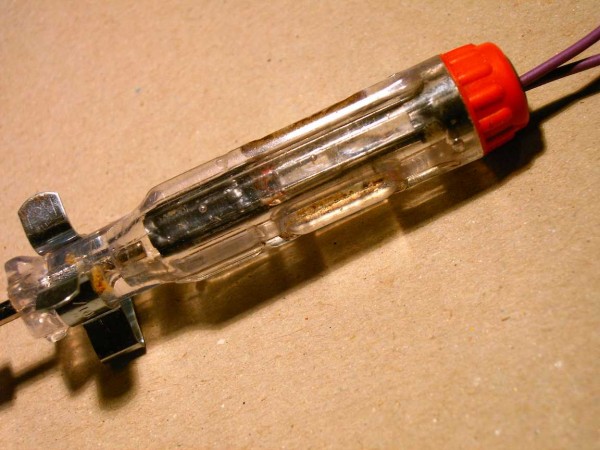
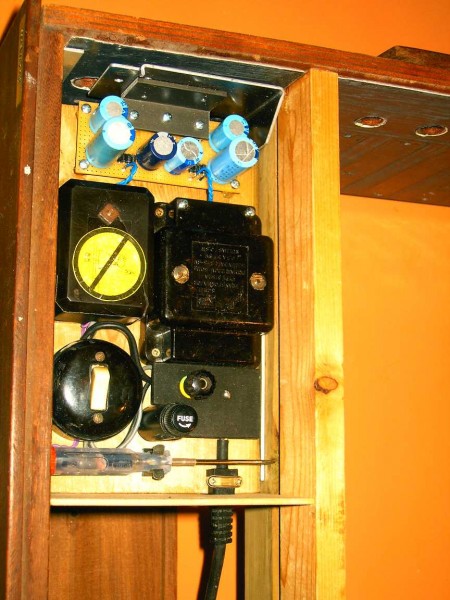
I installed the power indicator, made from a test screwdriver (with a neon light)  I was trying to figure out how to connect the power to it and keep I was trying to figure out how to connect the power to it and keep
it safe (was thinking of cutting a part of), untill I found out that you could easily take the light out. So I just soldered 2 wires to it and used some
plastic spacers to keep it from touching anything that could make it unsafe.
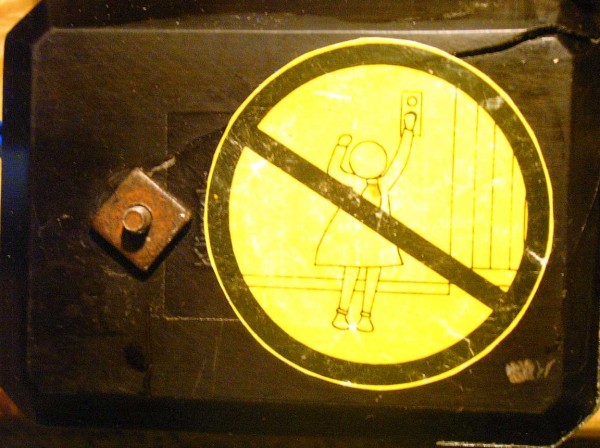
I fixed the gap in the transformer by attaching a piece of thin plastic. There is still a crack in it but it's pretty small and less dangerous then a standard
wallsocket. And I found a suitable safety sticker to put on it.  I also added a fuseholder and secured the mains wire. Oh and I attached a piece of I also added a fuseholder and secured the mains wire. Oh and I attached a piece of
scrapmetal for a bigger heatsink.
| Description: |
| Frankensynth PSU - indicator light parts |
|
| Filesize: |
75.17 KB |
| Viewed: |
805 Time(s) |
| This image has been reduced to fit the page. Click on it to enlarge. |
|
| Description: |
| Frankensynth PSU - indicator light complete |
|
| Filesize: |
83.67 KB |
| Viewed: |
680 Time(s) |
| This image has been reduced to fit the page. Click on it to enlarge. |
|
| Description: |
|
| Filesize: |
113.64 KB |
| Viewed: |
841 Time(s) |
| This image has been reduced to fit the page. Click on it to enlarge. |

|
| Description: |
| plastic covering a big gap in the transformer |
|
| Filesize: |
104.1 KB |
| Viewed: |
734 Time(s) |
| This image has been reduced to fit the page. Click on it to enlarge. |

|
| Description: |
|
| Filesize: |
102.63 KB |
| Viewed: |
657 Time(s) |
| This image has been reduced to fit the page. Click on it to enlarge. |
|
_________________
"My perf, it's full of holes!"
http://phobos.000space.com/
SoundCloud BandCamp MixCloud Stickney Synthyards Captain Collider Twitch YouTube |
|
|
Back to top
|
|
|
PHOBoS
Joined: Jan 14, 2010
Posts: 5603
Location: Moon Base
Audio files: 705
|
|
|
Back to top
|
|
|
blue hell
Site Admin

Joined: Apr 03, 2004
Posts: 24083
Location: The Netherlands, Enschede
Audio files: 278
G2 patch files: 320
|
| Posted: Fri Jan 31, 2014 2:21 pm Post subject:
|
|
|
Starts good for a Franken thingie :-)
_________________
Jan
also .. could someone please turn down the thermostat a bit.
 |
|
|
Back to top
|
|
|
PHOBoS
Joined: Jan 14, 2010
Posts: 5603
Location: Moon Base
Audio files: 705
|
| Posted: Fri Jan 31, 2014 3:23 pm Post subject:
|
|
|
Thanks Jan 
I have no idea yet how this synth is gonna turn out. I'm probably going to make a big case for it pretty soon, so I can just make modules instead of
testing and building a lot of circuits and then having to make a huge panel. This will also add to the look of being made up of different parts.
speaking of which, I just found a 5x5 LED matrix
I also have a 2x 5 LED VU meter chip (U2067) so that might be a fun combination. But I'm not sure if it'll work. The standard circuit has the LED's
connected in series and it works in BAR mode. But that was also the case with the UAA180, and I noticed that by connecting each LED directly to
the positive supply it worked in dot mode. So maybe that'll work with this one too.
_________________
"My perf, it's full of holes!"
http://phobos.000space.com/
SoundCloud BandCamp MixCloud Stickney Synthyards Captain Collider Twitch YouTube |
|
|
Back to top
|
|
|
PHOBoS
Joined: Jan 14, 2010
Posts: 5603
Location: Moon Base
Audio files: 705
|
| Posted: Sat Feb 01, 2014 4:52 am Post subject:
|
|
|
Connecting the LED's directly to the positive supply didn't work with this one, you just get a bar display but inversed. However with an additional 10
XOR gates (2x5) I got it working with the 5x5 matrix . It's not perfect yet, because there seem to be 2 LED's on, but very dim, when nothing should be
on. Im not sure how that works since the LED's are all connected to the ouputs of the XOR gates, so they should be on or off. I also want to try to do
it with 8 XOR's so I only need 2 extra chips instead of 3.
edit: interesting, when I disconnect all the cathodes of the LED matrix those LED's still turn on
_________________
"My perf, it's full of holes!"
http://phobos.000space.com/
SoundCloud BandCamp MixCloud Stickney Synthyards Captain Collider Twitch YouTube
Last edited by PHOBoS on Sun Feb 02, 2014 1:48 pm; edited 1 time in total |
|
|
Back to top
|
|
|
PHOBoS
Joined: Jan 14, 2010
Posts: 5603
Location: Moon Base
Audio files: 705
|
|
|
Back to top
|
|
|
PHOBoS
Joined: Jan 14, 2010
Posts: 5603
Location: Moon Base
Audio files: 705
|
| Posted: Sun Feb 02, 2014 2:01 pm Post subject:
|
|
|
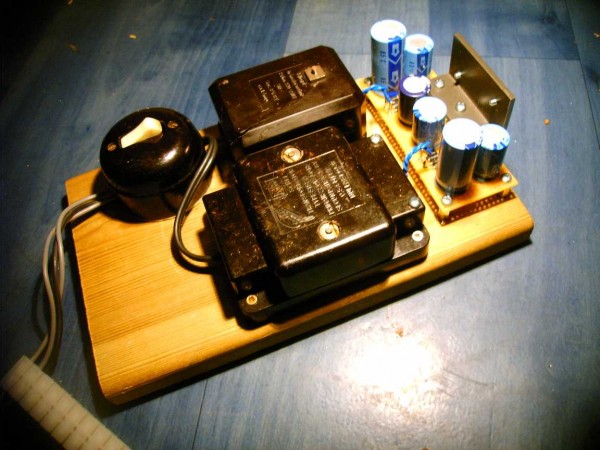
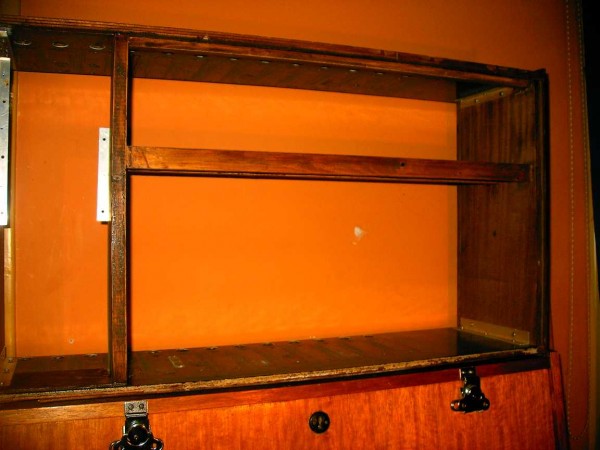
I installed the PSU today. I'll probably have to make more PSU's, maybe one just for LED's/lamps, and I have some nice space for that left. I have an
idea for a small spring reverb, and that might draw some current too, but I have a bunch of small transformers that could be useful to power something
like that. I also found a piece of metal mesh that fit's almost perfect as a cover. Maybe I'll make a small door with it or something.
At the moment I'm testing a sinewave generator, and I will try to use a vactrol to make it voltage controlled. I will make two and I have some large
transformers that might be useful for a ringmod. 
| Description: |
| Frankensynth PSU installed in case. |
|
| Filesize: |
76.79 KB |
| Viewed: |
706 Time(s) |
| This image has been reduced to fit the page. Click on it to enlarge. |

|
| Description: |
| Frankensynth PSU installed in case. |
|
| Filesize: |
106.85 KB |
| Viewed: |
598 Time(s) |
| This image has been reduced to fit the page. Click on it to enlarge. |
|
| Description: |
| Frankensynth PSU installed in case. (backside) |
|
| Filesize: |
79.84 KB |
| Viewed: |
665 Time(s) |
| This image has been reduced to fit the page. Click on it to enlarge. |

|
_________________
"My perf, it's full of holes!"
http://phobos.000space.com/
SoundCloud BandCamp MixCloud Stickney Synthyards Captain Collider Twitch YouTube |
|
|
Back to top
|
|
|
noto

Joined: Nov 05, 2009
Posts: 24
Location: portland
|
| Posted: Sun Feb 02, 2014 3:42 pm Post subject:
|
|
|
such a good idea to use the level meter chip as a waveshaper!!!
i was worried that i wouldn't find a use for my lm3914's after i realized they are kind of not good for much...
i definitely want to try this now |
|
|
Back to top
|
|
|
scriptstyle

Joined: Jan 22, 2008
Posts: 250
Location: nj
|
| Posted: Sun Feb 02, 2014 11:27 pm Post subject:
|
|
|
 very cool more... this will get me excited to jump into those old junk bins. i score more stuff then i can use, but you are putting cool stuff in here so far! very cool more... this will get me excited to jump into those old junk bins. i score more stuff then i can use, but you are putting cool stuff in here so far! |
|
|
Back to top
|
|
|
PHOBoS
Joined: Jan 14, 2010
Posts: 5603
Location: Moon Base
Audio files: 705
|
| Posted: Mon Feb 03, 2014 6:08 am Post subject:
|
|
|
| noto wrote: | such a good idea to use the level meter chip as a waveshaper!!!
i was worried that I wouldn't find a use for my lm3914's after i realized they are kind of not good for much...
i definitely want to try this now |
Thanks , you could build a 5 pulser with it or come up with some other kind of waveshaper yourself.
It's also used in my LED-O-SCOPE and there's one in my stupid pattern generator aswell.
| scriptstyle wrote: | | very cool more... this will get me excited to jump into those old junk bins. i score more stuff then i can use, but you are putting cool stuff in here so far! |
If it inspires other people to do the same, that would be great! I'd love to see some more Frankensynths.
And it's a great way to sort out and get rid of some junk (well not really getting rid of but putting it to use).
_________________
"My perf, it's full of holes!"
http://phobos.000space.com/
SoundCloud BandCamp MixCloud Stickney Synthyards Captain Collider Twitch YouTube |
|
|
Back to top
|
|
|
PHOBoS
Joined: Jan 14, 2010
Posts: 5603
Location: Moon Base
Audio files: 705
|
| Posted: Thu Feb 06, 2014 4:55 pm Post subject:
|
|
|
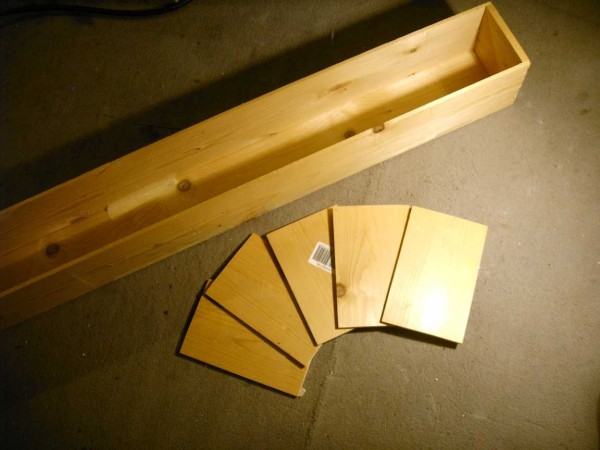
I cut some panels from a strip of wood which was the lid of a box for wine bottles. And it has 3 more sides that I can cut into panels
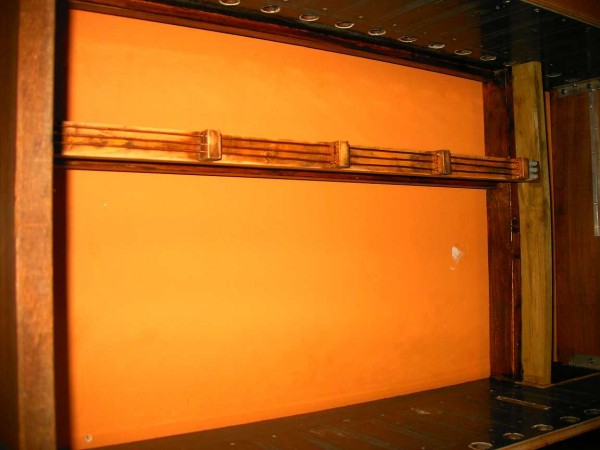
I then installed some mounting rails which I treated with some very old darkbrown stain (I had the remove a very thick solid layer first), and rubbed
with some steelwool to make them less glossy. I also installed some busbars for the powersupply, inspired by this.
| Description: |
|
| Filesize: |
62.22 KB |
| Viewed: |
675 Time(s) |
| This image has been reduced to fit the page. Click on it to enlarge. |
|
| Description: |
| mounting rails for modules |
|
| Filesize: |
65.57 KB |
| Viewed: |
622 Time(s) |
| This image has been reduced to fit the page. Click on it to enlarge. |
|
| Description: |
|
| Filesize: |
53.12 KB |
| Viewed: |
659 Time(s) |
| This image has been reduced to fit the page. Click on it to enlarge. |
|
_________________
"My perf, it's full of holes!"
http://phobos.000space.com/
SoundCloud BandCamp MixCloud Stickney Synthyards Captain Collider Twitch YouTube |
|
|
Back to top
|
|
|
PHOBoS
Joined: Jan 14, 2010
Posts: 5603
Location: Moon Base
Audio files: 705
|
| Posted: Thu Feb 06, 2014 5:51 pm Post subject:
Frankensynth dual Sine Wave VCO |
|
|
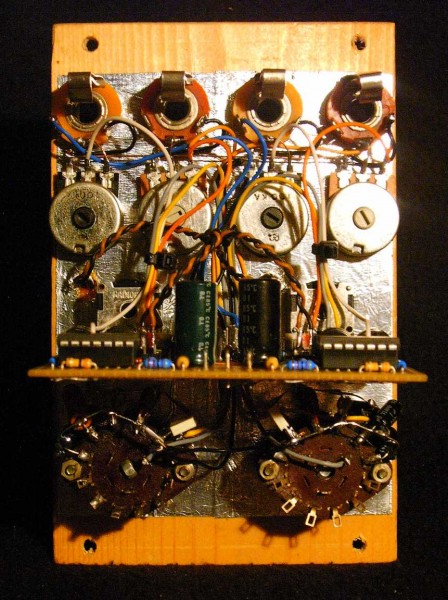
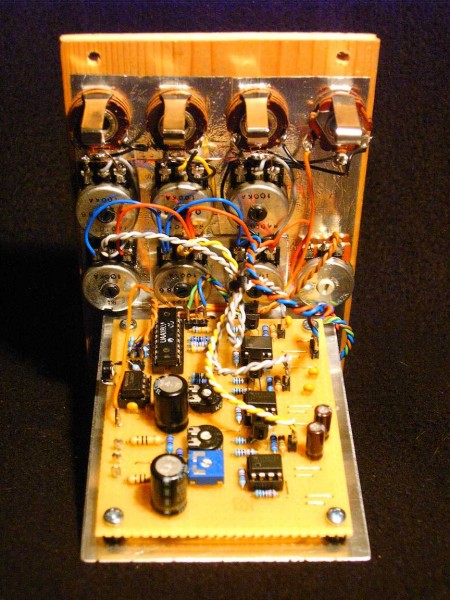
The first module is finished; a dual sine wave VCO. Not an old circuit I had laying around, but I needed something to use with the waveshaper and I
had 2 10K stereopots, old rotary switches and useful lamps. I got the original design form here and I added some vactrols to make it voltage controlled.
I connected them to the other (unused) side of the pot so I didn't need an extra switch. The maximum output voltage I could get with the dual 7.5V supply
and the lamps I used is 5Vpp so that will probably be the range I use for the whole synth.
If you look at the schematic (from left to right) then the first opamp adds an offset of 2.5V and it also inverts. So with an input voltage of -2.5 to +2.5V
the ouput will vary between -5V and 0. The next opamp inverts it back to get a voltage range of 0 to +5V. Then it get's buffered and the last opamp (of
the TL074) is used as a current controller for the vactrols. I also added a diode and a resistor in the current loop for some extra protection, and
another LED that functions as an indicator. What I didn't think about is that with no input connected (0V) the LED's will be on (they turn off at -2.5V)
and as a result you can't get the full range manually. So I used the switch contacts on the jacks to provide a negative voltage. (for this to work
it needs to be unattenuated with no input signal)
The rotary switches are twelve position (without a stop) and I only needed 4. I did add an extra lower range using 2 10uF caps (not in the schematic),
so the total range is ± 1.5Hz to 150Khz in 5 steps, but they still have 7 unused postions. If you turn the frequency knob (or use CV) it doesn't
react instantly but wobbles a bit, which also causes some clipping. Exactly what I want for this synth.
The text on the panel is done using some old rub-on letters which worked surprisingly well. To protect them from rubbing back off I added some
spray lacquer. I don't have enough of them to do a lot of panels but I don't want those to look the same anyway.
| Description: |
| Frankensynth dual Sine Wave VCO front |
|
| Filesize: |
111.17 KB |
| Viewed: |
595 Time(s) |
| This image has been reduced to fit the page. Click on it to enlarge. |

|
| Description: |
| Frankensynth dual Sine Wave VCO back |
|
| Filesize: |
137.88 KB |
| Viewed: |
622 Time(s) |
| This image has been reduced to fit the page. Click on it to enlarge. |
|
| Description: |
| Frankensynth dual Sine Wave VCO back |
|
| Filesize: |
115.37 KB |
| Viewed: |
653 Time(s) |
| This image has been reduced to fit the page. Click on it to enlarge. |

|
| Description: |
| Frankensynth dual Sine Wave VCO schematic |
|
| Filesize: |
74.41 KB |
| Viewed: |
897 Time(s) |
| This image has been reduced to fit the page. Click on it to enlarge. |
|
_________________
"My perf, it's full of holes!"
http://phobos.000space.com/
SoundCloud BandCamp MixCloud Stickney Synthyards Captain Collider Twitch YouTube
Last edited by PHOBoS on Fri Feb 07, 2014 6:31 am; edited 6 times in total |
|
|
Back to top
|
|
|
PHOBoS
Joined: Jan 14, 2010
Posts: 5603
Location: Moon Base
Audio files: 705
|
|
|
Back to top
|
|
|
DUBmatze

Joined: Feb 18, 2013
Posts: 150
Location: south Germaica (schwabilon)
|
| Posted: Fri Feb 07, 2014 12:22 am Post subject:
|
|
|
Phobos I am in sorrow .... you get enough sleep? or have I saved incorrectly that you are from u-rope?
Your new forum is a nice place! this synth got a nice look so far steam punky - you will also use some mechanical components?
(like here: http://www.youtube.com/watch?v=vvtssL8WlJA ) |
|
|
Back to top
|
|
|
PHOBoS
Joined: Jan 14, 2010
Posts: 5603
Location: Moon Base
Audio files: 705
|
| Posted: Fri Feb 07, 2014 4:12 am Post subject:
|
|
|
Thanks, yes I'm in europe but I don't have to get up very early so I do get some sleep, it's not a lot though but it seems to be enough.
It does have a bit of a steampunk/antique look right now mainly because of the dark wood and PSU. But I didn't make any plans on how I want it to
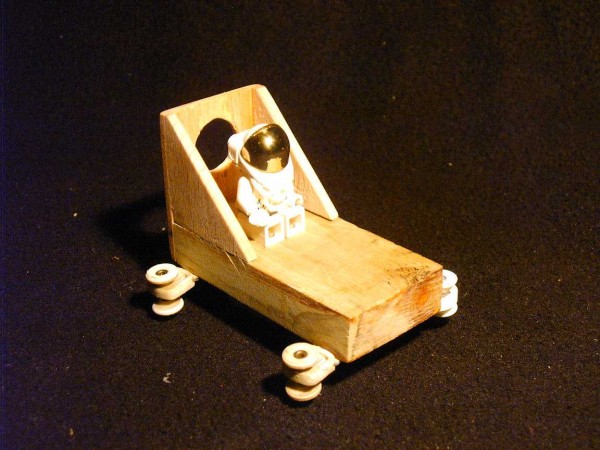
look, I just started building. So we'll see how it ends up. And yes I might put something mechanical in there, but not sure yet, because it's such a
large case and it would amplify and mechanical noises. But maybe some small stuff like this:
(Gijs is a god  more info here ) more info here )
_________________
"My perf, it's full of holes!"
http://phobos.000space.com/
SoundCloud BandCamp MixCloud Stickney Synthyards Captain Collider Twitch YouTube |
|
|
Back to top
|
|
|
DUBmatze
Joined: Feb 18, 2013
Posts: 150
Location: south Germaica (schwabilon)
|
| Posted: Fri Feb 07, 2014 2:30 pm Post subject:
|
|
|
i know his page - i realy like his special way to "de-snob" the eurorack modules
i realy like his spring verb and the "HDD scratcher"... |
|
|
Back to top
|
|
|
scriptstyle
Joined: Jan 22, 2008
Posts: 250
Location: nj
|
| Posted: Sat Feb 08, 2014 9:11 am Post subject:
|
|
|
very cool, i think i have a extra GameBoy in a junkbox somewhere around here  |
|
|
Back to top
|
|
|
PHOBoS
Joined: Jan 14, 2010
Posts: 5603
Location: Moon Base
Audio files: 705
|
| Posted: Sun Feb 09, 2014 1:45 pm Post subject:
|
|
|
I finished the waveshaper. For the test I recorded I just hooked up what I had already breadboarded to the new PSU (I tested with a single 12V
before). I noticed that it didn't work as it should (although it sounded nice) but for some reason changing the upper level didn't have much
effect. So I checked the datasheet and saw that the max input level for all 3 inputs is 6V. Since I'm using a dual supply (+/- 7.5V) that corresponds
with -1.5V. The signal from the sinewave oscillators is -2.5V ... +2.5V so it makes sense that it didn't work.
Another thing is the input range:
| Quote: | Voltage difference for smooth light transition min. 1.0V
Voltage difference for abrupt light transition min. 4.0V |
So I wanted a range of 4V. It could be 6V max. but that would set the lower voltage at -7.5V which is the same as the supply and beyond the
limit of the opamps. So with 4V the range is -5.5V ... -1.5V. I used 2 opamps, one to adjust the range from 5V to 4V and the other one to add
the offset voltage and get it to -5.5 ... -1.5V.
I also added offset control to the first opamp, but because of this it can go beyond the range that I wanted. I mentioned in the chatroom that I was
working on the waveshaper and needed to limit the voltage, which resulted in Fredvard posting the following simple circuit for a limiter.

I tried it and it works perfect. (thanks again Fred!) And it also makes it possible to set the levels of all the 3 inputs (Low, Ctrl, High) at once.
I also tried if I could use it to connect the Low and High levels to eachother, so that the Low Level can never go above the High level and
the other way around. But because of the voltage drop over the transistor this didn't work and the crosslinking caused some weird behaviour.
It actually worked better with a simple diode to short the ouputs of the opamps together. But controlling it turned out more confusing that way, so
in the end I just left it simple with level and offset control for all the 3 inputs. There's also an extra opamp on the output as a buffer. (I used a
TL072 because it was easier to design the PCB for then a TL071)
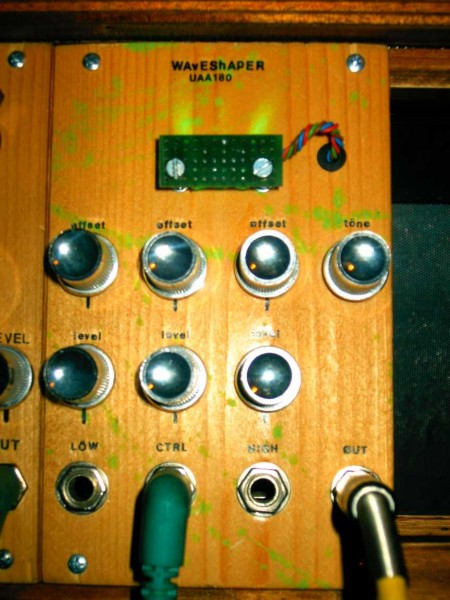
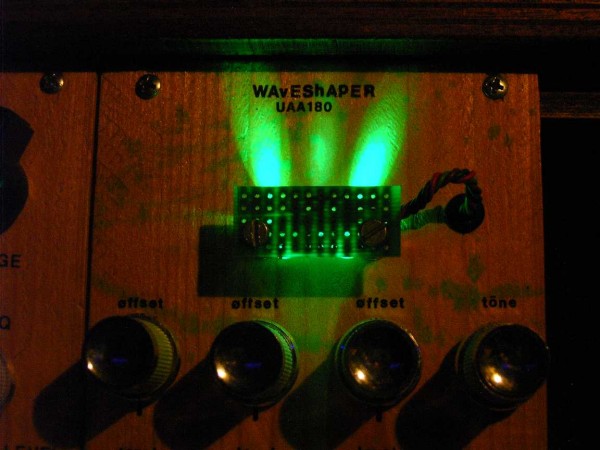
I used bright green LED's but since I don't want to be blinded by them I bend them 90 degrees and mounted them on a piece of perf. This way
they shine across the top of the panel,. but there is also some light going downwards. I used some splashes of neon green (UV reactive) paint to
spice the panel up a bit but that's not really visible in the photo,. So I'll try to take a better one with LED's and UV light on.
| Description: |
| Frankensynth UAA180 Waveshaper V2 schematic |
|
| Filesize: |
83.03 KB |
| Viewed: |
955 Time(s) |
| This image has been reduced to fit the page. Click on it to enlarge. |
|
| Description: |
| Frankensynth UAA180 Waveshaper |
|
| Filesize: |
93.45 KB |
| Viewed: |
667 Time(s) |
| This image has been reduced to fit the page. Click on it to enlarge. |

|
| Description: |
| Frankensynth UAA180 Waveshaper |
|
| Filesize: |
130.4 KB |
| Viewed: |
644 Time(s) |
| This image has been reduced to fit the page. Click on it to enlarge. |
|
| Description: |
| Frankensynth UAA180 Waveshaper |
|
| Filesize: |
79.84 KB |
| Viewed: |
588 Time(s) |
| This image has been reduced to fit the page. Click on it to enlarge. |
|
_________________
"My perf, it's full of holes!"
http://phobos.000space.com/
SoundCloud BandCamp MixCloud Stickney Synthyards Captain Collider Twitch YouTube
Last edited by PHOBoS on Mon Feb 10, 2014 1:59 pm; edited 1 time in total |
|
|
Back to top
|
|
|
PHOBoS
Joined: Jan 14, 2010
Posts: 5603
Location: Moon Base
Audio files: 705
|
|
|
Back to top
|
|
|
PHOBoS
Joined: Jan 14, 2010
Posts: 5603
Location: Moon Base
Audio files: 705
|
|
|
Back to top
|
|
|
PHOBoS
Joined: Jan 14, 2010
Posts: 5603
Location: Moon Base
Audio files: 705
|
|
|
Back to top
|
|
|
robsol
Stream Operator

Joined: Apr 24, 2009
Posts: 2492
Location: Bristol UK
Audio files: 495
|
| Posted: Mon Feb 10, 2014 10:18 am Post subject:
|
|
|
Ah, a space elevator module. Never leave the planet without it.
I love the way this is turning out!
_________________
Muied Lumens Sub Forum
Bandcamp |
|
|
Back to top
|
|
|
PHOBoS
Joined: Jan 14, 2010
Posts: 5603
Location: Moon Base
Audio files: 705
|
|
|
Back to top
|
|
|
|

 Forum index » DIY Hardware and Software » Stickney Synthyards

 and they both have 3V-5V-8V outputs (allthough the big one seems to be higher then that).