| Author |
Message |
rjd2
Joined: Sep 02, 2007
Posts: 236
Location: philly
|
|
|
Back to top
|
|
 |
andrewF

Joined: Dec 29, 2006
Posts: 1176
Location: australia
Audio files: 4
|
 Posted: Mon Aug 10, 2009 4:32 pm Post subject: Posted: Mon Aug 10, 2009 4:32 pm Post subject:
|
  |
|
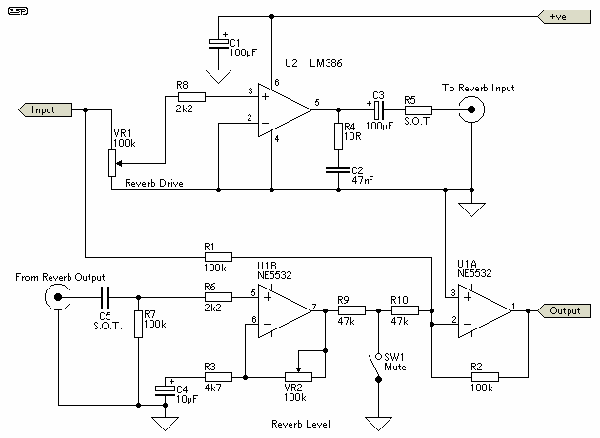
Sorry if this seems too obvious but its not marked on the schematic, did you connect the power pins of the 5532?
Pins 1&8 of the 386 can be left unconnected or you can connect a cap across them, this article explains a bit - 386 amp, probably not necessary at this stage, plenty of other things to check.
R1 on the schematic is sending a dry signal straight to the output opamp, maybe worth disconnecting this resistor until you get the circuit working (personally i would remove it forever or put an attenuating pot in the way) |
|
|
Back to top
|
|
|
rjd2
Joined: Sep 02, 2007
Posts: 236
Location: philly
|
| Posted: Mon Aug 10, 2009 5:56 pm Post subject:
|
|
|
no, please-nothings too obvious for me!
yes, both the 5532's and the 386(i apparently have a jrc 386bd here) have their power pins right. this was really the only thing i knew how to check on my bench,cause i cant plug it into the spring AND have it on the bench.
i'll try disconnecting R1 and see where that gets me.
im thinking that my wiring is probably the next suspect aspect of this? |
|
|
Back to top
|
|
|
rjd2
Joined: Sep 02, 2007
Posts: 236
Location: philly
|
| Posted: Mon Aug 10, 2009 6:30 pm Post subject:
|
|
|
ok, HERE"S a green question:
on the potentiomter diagram, there are 3 lines coming out. 2 out the "sides of the box", and one that's an arrow towards the middle. is the arrow towards the middle the middle pin, and the lines coming out the sides the L and R pins of the pot? this is now seeming very wrong. and yet how i wired the pots for some reason...
sorry, im not coming from a "real" EE background. i can read the diagrams on most DIY instructions, but this is the first thing i've built without a pre-made pcb. |
|
|
Back to top
|
|
|
andrewF
Joined: Dec 29, 2006
Posts: 1176
Location: australia
Audio files: 4
|
| Posted: Mon Aug 10, 2009 7:11 pm Post subject:
|
|
|
Yes the line with the arrow connects to the middle pin.
It is important to get this connection right, the outerpins don't matter other than deciding which way to turn the pot for min/max values.
On VR1, the centre pin connects to R8, one of the outer pins to ground, the other to the input. When a pot is connected like this (one pin to ground) it acts as a divider or attenuator. for example, when set halfway it will reduce the input signal by 50%.
On VR2, the centre pin and one of the outer pins are connected together and connected to R9 and pin 7 of U1B. The other pin is connected to pin6 of U1B and R3. This pot is acting as a rheostat, basically it is just a resistor that you can adjust to any value between 0 and 100k Ohm. |
|
|
Back to top
|
|
|
andrewF
Joined: Dec 29, 2006
Posts: 1176
Location: australia
Audio files: 4
|
| Posted: Mon Aug 10, 2009 7:20 pm Post subject:
|
|
|
| rjd2 wrote: |
sorry, im not coming from a "real" EE background. i can read the diagrams on most DIY instructions, but this is the first thing i've built without a pre-made pcb. |
few of us are, I was well over 30 the 1st time I held a soldering iron and discovered the pretty coloured stripes on resistors actually meant something 
Trouble-shooting nonworking ccts is the best way to learn....tho an oscilloscope makes life much easier. |
|
|
Back to top
|
|
|
rjd2
Joined: Sep 02, 2007
Posts: 236
Location: philly
|
| Posted: Mon Aug 10, 2009 7:52 pm Post subject:
|
|
|
| ive got a scope, dvm, desoldering and soldering iron, so im pretty good to go on the toys! ill keep plugging on this, thanks for the help. |
|
|
Back to top
|
|
|
daverj
Joined: Jul 07, 2009
Posts: 28
Location: USA
|
| Posted: Tue Aug 11, 2009 11:55 am Post subject:
|
|
|
| rjd2 wrote: | yes, both the 5532's and the 386(i apparently have a jrc 386bd here) have their power pins right. this was really the only thing i knew how to check on my bench,cause i cant plug it into the spring AND have it on the bench.
|
Is pin 4 of the NE5532 going to a negative power supply? The 386 can run off of plus power and ground because it internally biases the input, but the NE5532 is a normal op amp and the way this circuit is laid out it needs to use bipolar power supplies (ie: +/-12 or +/-15) |
|
|
Back to top
|
|
|
rjd2
Joined: Sep 02, 2007
Posts: 236
Location: philly
|
| Posted: Tue Aug 11, 2009 1:07 pm Post subject:
|
|
|
i have pins 4 and 8 of the 5532's going to -V and +V respectively.
and pin 6 of the 386 going to +V.
however, i dont have any of their pins connected to ground. which pins would be ground? |
|
|
Back to top
|
|
|
daverj
Joined: Jul 07, 2009
Posts: 28
Location: USA
|
| Posted: Tue Aug 11, 2009 1:25 pm Post subject:
|
|
|
pin 2 & 4 of the 386 go to ground. None of the NE5532 pins go to ground. Though it would be a good idea to have a pair of .1uf caps between the power pins and ground.
You said you have a scope... With everything connected, do you have an audio waveform showing at the input to the spring (coming from the 386)? And is there an audio waveform at pin 7 of the NE5532? |
|
|
Back to top
|
|
|
Uncle Krunkus
Moderator

Joined: Jul 11, 2005
Posts: 4761
Location: Sydney, Australia
Audio files: 52
G2 patch files: 1
|
| Posted: Wed Aug 12, 2009 5:07 am Post subject:
|
|
|
Hey rjd2,
You do know that -V is not the same as ground yeah?
What daverj was saying may not have made you realise this.
The NE5532 actualy needs a bi-polar supply. That means -V, Ground & +V.
Three connections.
The 386 will just use Ground and +V.
Does that make sense?
_________________
What makes a space ours, is what we put there, and what we do there. |
|
|
Back to top
|
|
|
Uncle Krunkus
Moderator
Joined: Jul 11, 2005
Posts: 4761
Location: Sydney, Australia
Audio files: 52
G2 patch files: 1
|
| Posted: Wed Aug 12, 2009 5:09 am Post subject:
|
|
|
The thing I'm unsure about is the "S.O.T." on R5 and C5.
Does anyone know what that means?
_________________
What makes a space ours, is what we put there, and what we do there. |
|
|
Back to top
|
|
|
esnabez
Joined: May 01, 2009
Posts: 13
Location: Brooklyn, NY
|
| Posted: Wed Aug 12, 2009 7:53 am Post subject:
|
|
|
| S.O.T stands for "select on test". Those components are variable depending on which reverb tank you choose. |
|
|
Back to top
|
|
|
rjd2
Joined: Sep 02, 2007
Posts: 236
Location: philly
|
| Posted: Wed Aug 12, 2009 9:53 am Post subject:
|
|
|
| Uncle Krunkus wrote: | Hey rjd2,
You do know that -V is not the same as ground yeah?
What daverj was saying may not have made you realise this.
The NE5532 actualy needs a bi-polar supply. That means -V, Ground & +V.
Three connections.
The 386 will just use Ground and +V.
Does that make sense? |
yea, got that. thanks. for the 5532, ive got -V and +V, no ground ref.
for the 386, ive now got pins 2 and 4 to ground, pin 6 to +V.
im gonna do the scope test and see if i can get from input to spring send in later today... |
|
|
Back to top
|
|
|
Uncle Krunkus
Moderator
Joined: Jul 11, 2005
Posts: 4761
Location: Sydney, Australia
Audio files: 52
G2 patch files: 1
|
| Posted: Wed Aug 12, 2009 3:06 pm Post subject:
|
|
|
| esnabez wrote: | | S.O.T stands for "select on test". Those components are variable depending on which reverb tank you choose. |
Oh,... Thanks for that. Hadn't come across it before.
And thanks for this thread/schem rjd2, I've actually got a nice tank which I salvaged from an old Peavey desk, and that schem is a nice simple one to start playing around with.
_________________
What makes a space ours, is what we put there, and what we do there. |
|
|
Back to top
|
|
|
rjd2
Joined: Sep 02, 2007
Posts: 236
Location: philly
|
| Posted: Wed Aug 12, 2009 4:49 pm Post subject:
|
|
|
ok, so i believe i have isolated the problem to the output end.
if i send a square wave to the input jack, i get a square wave at "reverb in".
however, if i send square wave to the "reverb out" pin of the circuit, i dont seem to get a square wave at the output jack.
i should, right?
so i think i'll send square wave to "reverb out", and trace it to see where it dies? |
|
|
Back to top
|
|
|
Uncle Krunkus
Moderator
Joined: Jul 11, 2005
Posts: 4761
Location: Sydney, Australia
Audio files: 52
G2 patch files: 1
|
| Posted: Wed Aug 12, 2009 6:21 pm Post subject:
|
|
|
Okay,
check the mute switch isn't closed,
check the reverb level pot is up,
did you use the same resistor values?
electrolytic cap the right way round?
IC pin numbering okay?
_________________
What makes a space ours, is what we put there, and what we do there. |
|
|
Back to top
|
|
|
rjd2
Joined: Sep 02, 2007
Posts: 236
Location: philly
|
| Posted: Wed Aug 12, 2009 6:42 pm Post subject:
|
|
|
thanks, unk!
so i had forgotten that i had disconnected the input at pin 2 of the last 5532.
so now, i can send a square wave to "reverb out" pin, and then see that square wave at the output jack.
as ive verified the same thing from input jack, to "reverb in" pin, i think i can verify that the driver is at least built properly.
now, i guess its up to the tank.....wish me luck!
i believe |
|
|
Back to top
|
|
|
Uncle Krunkus
Moderator
Joined: Jul 11, 2005
Posts: 4761
Location: Sydney, Australia
Audio files: 52
G2 patch files: 1
|
| Posted: Wed Aug 12, 2009 7:47 pm Post subject:
|
|
|
Well, it's still a good idea to test it with R1 not connected to the 5532, so you can hear only what's coming through the tank. But make sure R10 and R2 are still connected to pin 2.
_________________
What makes a space ours, is what we put there, and what we do there. |
|
|
Back to top
|
|
|
|

 Forum index » DIY Hardware and Software