| Author |
Message |
23isgood

Joined: Nov 18, 2006
Posts: 236
Location: San Francisco, CA bay area
Audio files: 13
|
 Posted: Wed Nov 07, 2007 6:54 pm Post subject:
DIY PCB Techniques? Posted: Wed Nov 07, 2007 6:54 pm Post subject:
DIY PCB Techniques?
Subject description: Share your Techniques here |
  |
|
Hi folks. I have been struggling with making my own PCB's for quite a while now. It is very difficult to get consistent results. I have just about tried every technique that I have come across.
I tried printing on glossy photo paper using photo copiers, and color - black and white laser printers. I have tried printing directly onto those PCB press and peel films. Lately I have been printing onto clear laser transparencies. Using transparencies is by far the simplest technique I have tried so far.
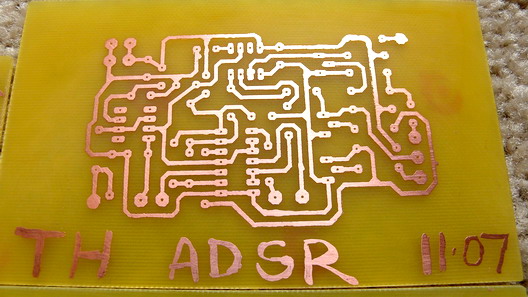
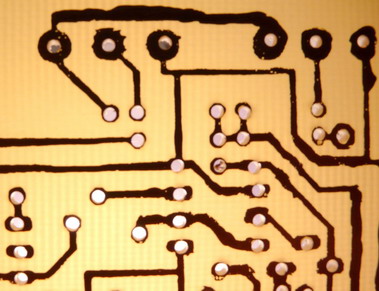
These all work but rarely can I get excellent results. The toner rarely completely adheres to the copper. I always have to touch up the toner after I have ironed it on. I discovered that the best way to fix the design is by painting in the missing traces with black acrylic paint, using a small paint brush. Yes this is a huge pain in the arse. It never looks good but it works, as you can see from the pic's below. After the board is etched, the traces usually have little holes. I try to fix that by running the iron over them and filling them up with solder. It would be nice if the tiny holes weren't there in the first place. Oh how about getting the PCB design to be correctly sized before printing? That is one of the biggest problems I always encounter.
The only technique that I haven't tried is using pre sensitized copper boards and the UV light. I have avoided this technique, basically because its very expensive. How do you guys do your own PCB's? I see all these great DIY PCB's out there and it leaves me wondering what I'm missing?
Thanks,
pete
| Description: |
| This one came out good, though I still had to touch it up before etching. |
|
| Filesize: |
74.72 KB |
| Viewed: |
32687 Time(s) |
|
| Description: |
| Here is an example of the tiny holes in the traces. |
|
| Filesize: |
59.79 KB |
| Viewed: |
32687 Time(s) |
|
| Description: |
|
| Filesize: |
236.56 KB |
| Viewed: |
319 Time(s) |
| This image has been reduced to fit the page. Click on it to enlarge. |
|
_________________
Check out my music |
|
|
Back to top
|
|
 |
SineSurfer
Joined: Jan 19, 2007
Posts: 45
Location: Mexico
|
| Posted: Wed Nov 07, 2007 8:30 pm Post subject:
|
|
|
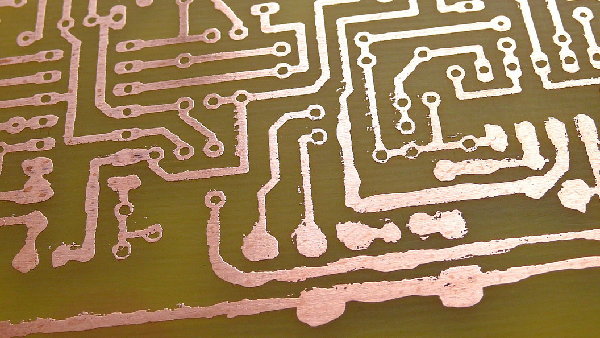
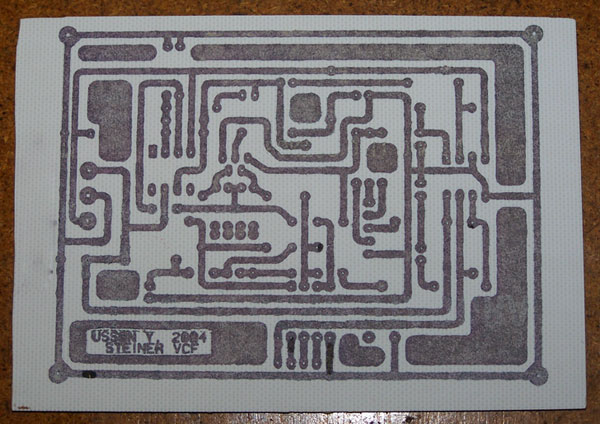
I got the best results using glossy magazine paper, the thinner the better when peeling off from the pcb, and print with the highest quality available on the laser printer, this gives you more ink to transfer to the paper.
Set iron to the hottest setting
trim the paper to the minimal size needed to get enough space for the iron to maneuver
fix the paper to the pcb with tape to be sure every part is in contact with the cooper
lay the pcb on a steady surface
iron the paper with special care on the borders and corners, the paper starts to turn yellow and transparent (you can see the ink thru)
and just when you think it's done, iron some more.
btw. I think you are getting close to the average results using this method, just practice some more 
some examples:
| Description: |
|
| Filesize: |
73.81 KB |
| Viewed: |
32663 Time(s) |
|
| Description: |
|
| Filesize: |
45.49 KB |
| Viewed: |
32663 Time(s) |

|
|
|
|
Back to top
|
|
|
elektro80
Site Admin

Joined: Mar 25, 2003
Posts: 21959
Location: Norway
Audio files: 14
|
| Posted: Wed Nov 07, 2007 9:12 pm Post subject:
|
|
|
Possibly off topic... but..
I´ve never tried that transfer stuff from laser printed sheets so I dunno how this actually works. Is it of importance to get a lot of toner in the "black" areas?
Printing black and white on a laser printer will usually result in less dense black than if you had printed the same image in colour. Additionally you can also adjust the amounts of CMY in a "black" as well.
Theoretically you can end up with a black that is like 3-4 times as dense as printing black using just the K toner. This means you have say 100% of each of the four toners instead of simply 100% K.
Keep in mind that you will have to use CMYK and not RGB and you need to assign your new tweaked rich black to the old daft black areas. This is easy when using applicatons like Adobe Illustrator.
This same method is actually used in traditional colour printing in order to get dense and rich blacks. It is quote possible to overdo this and end up with a print run that has blacks that will never quite dry up and instead will bleed and smear and basically end up all over the place.
Just a thought.. just in case more cowbell is a good thing?
_________________
A Charity Pantomime in aid of Paranoid Schizophrenics descended into chaos yesterday when someone shouted, "He's behind you!"
MySpace
SoundCloud
Flickr |
|
|
Back to top
|
|
|
SineSurfer
Joined: Jan 19, 2007
Posts: 45
Location: Mexico
|
| Posted: Wed Nov 07, 2007 9:56 pm Post subject:
|
|
|
| elektro80 wrote: | | ... Is it of importance to get a lot of toner in the "black" areas? |
If not a lot, at least an uniform toner layer to ease the transfer.
Everything breaks on the weakest point, same for the toner, it tends to stick to the paper on those places instead of going with the cooper.
so basically, you gotta have more cowbell!  |
|
|
Back to top
|
|
|
elektro80
Site Admin
Joined: Mar 25, 2003
Posts: 21959
Location: Norway
Audio files: 14
|
| Posted: Wed Nov 07, 2007 10:02 pm Post subject:
|
|
|
OK, then the suggested CMYK rich black method above should work fine. Keep in mind that each colour is on a raster and there is an offset/angle. This means that a "rich" black will not only be denser but also with a more tightly packed toner.. less cracks.
_________________
A Charity Pantomime in aid of Paranoid Schizophrenics descended into chaos yesterday when someone shouted, "He's behind you!"
MySpace
SoundCloud
Flickr |
|
|
Back to top
|
|
|
Luka

Joined: Jun 29, 2007
Posts: 1003
Location: Melb.
|
|
|
Back to top
|
|
|
slo

Joined: Feb 18, 2007
Posts: 204
Location: Victoria, BC
Audio files: 1
|
| Posted: Wed Nov 07, 2007 10:38 pm Post subject:
|
|
|
The toner transfer method works great for me, from day one. I use Staples Basic Photo glossy paper #471861.
I think the main thing is to scrub the crap out of the bare board first. I sand the bare copper first with wire wool, I have also used 3m abrasive pads and 600 sandpaper, then I clean the board with a cloth and actetone, till the cloth shows no dark marks from the board, then apply the iron for 3-5 mins, press down hard on the paper, iron out to the edges, and turn the board 90 degrees every minute or so. After that let cool a bit, then dunk in cold water to get the paper and the remaining layers off, if you have done the above properly, you can scrub the paper on the board with toothbrush (an old one please) and loose no toner. You should get first rate results doing it this way.
George |
|
|
Back to top
|
|
|
Luka
Joined: Jun 29, 2007
Posts: 1003
Location: Melb.
|
|
|
Back to top
|
|
|
23isgood
Joined: Nov 18, 2006
Posts: 236
Location: San Francisco, CA bay area
Audio files: 13
|
| Posted: Thu Nov 08, 2007 12:19 am Post subject:
|
|
|
You guys are right. More toner helps in getting it to stick to the copper. I think the best results I have had where from printing onto glossy photo paper
on a kinkos color photo copier. That gets expensive quickly. Kinkos is not cheap, especially when I like to print multiple copies in case it doesn't work on the first try.
I like the idea of using the magazine paper. Where do you get plain white pages?
_________________
Check out my music |
|
|
Back to top
|
|
|
creekree

Joined: Mar 30, 2006
Posts: 192
Location: Morgenland Neukölln
Audio files: 1
|
| Posted: Thu Nov 08, 2007 12:38 am Post subject:
|
|
|
i use the toner transfer method as well - with very good results. sorry, cant supply a pic.
i dont have a laser printer anymore, so i let those fine folks at office depot work for me 
i basically ask them to use their photo paper, so i dont know which brand it is.
the proper scaling is easily done in adobe illustrator, i then convert my layout to pdf format. it is important to tell them to not scale the image when printing (i think this is used by default so they have to uncheck the box in their print dialogue).
preparing the copper is important, i get best results with water and 600 grit sanding paper. make that copper shine! grease will make it harder for the toner to stick to the copper. also, when you use steel wool you might get scratches in the copper that are just a little too deep - hairline cracks in the traces will result.
take your time when ironing. if some of the traces are not transfered to the pcb when you carefully peel the soaked paper off then re-iron it.
the thing i like the most is that you can make pcb legends on the component side as well with this method with good results! actually the legend is easier to make than the traces...
ha, the only time i use the iron is for making pcbs... i dont iron my tshirts |
|
|
Back to top
|
|
|
softfin

Joined: Oct 11, 2006
Posts: 271
Location: Far in the north
Audio files: 1
|
|
|
Back to top
|
|
|
etaoin

Joined: Jun 30, 2005
Posts: 761
Location: Utrecht, NL
|
|
|
Back to top
|
|
|
fonik

Joined: Jun 07, 2006
Posts: 3950
Location: Germany
Audio files: 23
|
|
|
Back to top
|
|
|
Clack

Joined: Aug 08, 2005
Posts: 438
Location: Walthamstow - london
Audio files: 5
G2 patch files: 1
|
| Posted: Thu Nov 08, 2007 4:10 am Post subject:
|
|
|
For the laser technique I find that the cheaper you go the better the results.
I use a £50 HP printer and the cheapest glossy paper available called Magic paper.
I CAN get it to pull off perfectly with no errors.
I find magazine pages tend to create jaggidy edges to the image.
This technique doesnt work very well for big areas of solid black bigger than about 1cm squared.
You must clean the copper board very well
_________________
Clacktronics.co.uk |
|
|
Back to top
|
|
|
fluxmonkey
Joined: Jun 24, 2005
Posts: 708
Location: cleve
|
| Posted: Thu Nov 08, 2007 7:24 am Post subject:
|
|
|
I mostly use toner transfer via the blue press-n-peel method. things that have helped:
make the pads that you'll drill through as large as possible. sometimes i edit designs that i download by pasting over larger pads wherever i can.
CLEAN CLEAN CLEAN COPPER. this is the most critical thing. i scour it w/ bon ami or ajax and a green scrubbie to get off the grease, then rinse w/ distilled water, then air dry in the oven at about 200 degrees (prewarming helps the toner stick, too). don't touch the face of the board after cleaning, handle it by the edges.
warm boards before transferring; once you start, apply enough heat & pressure. i use an iron, and really lean on it. i put a layer of thin paper on top of the transfer so i can swirl the iron around w/ less chance of shifting the transfer sheet. cool thoroughly in cold water. peel off GRADUALLY, and at a 45degree angle to the traces.
use a sharpie pen to touch up any traces, or reinforce large black areas.
some of the edges can still be a little uneven compared to commercial boards, but functionally i've had good luck.
bbob |
|
|
Back to top
|
|
|
etaoin
Joined: Jun 30, 2005
Posts: 761
Location: Utrecht, NL
|
| Posted: Thu Nov 08, 2007 7:28 am Post subject:
|
|
|
Reading all these comments, press-n-peel sounds like it takes a lot more time to get right than the photographic method...
_________________
http://www.casia.org/modular/ |
|
|
Back to top
|
|
|
shawn
Joined: Dec 13, 2005
Posts: 209
Location: savannah
|
| Posted: Thu Nov 08, 2007 8:00 am Post subject:
|
|
|
The only iron method I found great was using high glossy laser paper. I bought a color laser printer recently and gave it a shot. The results are amazing. Once in a while the toner won't stick in areas but that's easy to touch up using a permanent marker. I did try the press n peel paper years ago but I didn't like the results plus it was too expensive. As the others have said, prep the board first. I use scotchbright pads and rub the hell out of the board then clean them up with acetone. When putting it on the board I find if you heat just an edge of the paper to the copper it will stick so it will be aligned then just move the iron over the rest of the paper/board.
Another method I've used before is the HPGL plotter method. It works pretty damn well except there's the pitfall of converting images into hpgl format so it can be printed. I spent more time working on that than actually making boards but I did get it to work.
Most expensive DIY way would be to use a cnc router. It works REALLY well, plus you can also have it drill the holes for you. You can also engrave your own frontpanels. Once my etchant runs out I'm going to start using this method more. |
|
|
Back to top
|
|
|
JuergenPB
Joined: Oct 30, 2007
Posts: 5
Location: Paderborn / Germany
|
|
|
Back to top
|
|
|
SineSurfer
Joined: Jan 19, 2007
Posts: 45
Location: Mexico
|
| Posted: Thu Nov 08, 2007 9:42 am Post subject:
|
|
|
| 23isgood wrote: | | I like the idea of using the magazine paper. Where do you get plain white pages? |
I use the pages from a DELL catalog, it comes by mail at the office each month
Then I just look for blank areas or with only text, the full page can work, even with images, but is harder to check if every line is printed right.
If any, the inks from the magazine stick over the toner, not on the copper so its safe for the transfer.
I think any thin and glossy paper will work fine. |
|
|
Back to top
|
|
|
shawn
Joined: Dec 13, 2005
Posts: 209
Location: savannah
|
| Posted: Thu Nov 08, 2007 10:50 am Post subject:
|
|
|
| I've thought about using a modified laminator, that's just great that it works! |
|
|
Back to top
|
|
|
fonik
Joined: Jun 07, 2006
Posts: 3950
Location: Germany
Audio files: 23
|
| Posted: Fri Nov 09, 2007 11:03 am Post subject:
|
|
|
just wanted to add some pics from the PCBs i am going to etch tonight. made using press'n'peel blue (PCB for Roman Sowa's AD633 rinmod and a tonepad PCB for an octaver i'm gonna build for my wife as an christmas present!). you can see how sharp the edges are. traces could be much much thinner...


_________________

cheers,
matthias
____________
Big Boss at fonitronik
Tech Buddy at Random*Source |
|
|
Back to top
|
|
|
Randaleem
Joined: May 17, 2007
Posts: 456
Location: Northern CA, USA
|
| Posted: Fri Nov 09, 2007 4:36 pm Post subject:
|
|
|
| shawn wrote: | | I've thought about using a modified laminator, that's just great that it works! |
HI, there is a very active yahoo group called homebrewPCB that has great info on many different means to produce PCB's. They also have lists of the best laminators to use and how to modify them for better results.
You want a high pressure laminator. Some of the more expensive ones use a flat hot plate which works well for laminating but not very well for PCB making. (Trades large heated area for pressure.)
The group also discusses different and inexpensive chemicals for etching; Cupric chloride for example.
BTW, from tests done in that group, I can tell you that a Staedler/lumocolor RED ink marker works MUCH better than a sharpie for resist duty. They tested dozens of types, and everything from wax to furniture polish looking for the best resist, and this marker won out.
The group also has info on using Epson printers to print resist direct to the PCBs. I have 4 epsons behind me as I type in the process of being set up to do this. (C84 and C86, i.e., durabrite ink types.)
Kind regards, Randal |
|
|
Back to top
|
|
|
Thomas Henry
Joined: Mar 25, 2007
Posts: 298
Location: Southern Minnesota
Audio files: 2
|
| Posted: Fri Nov 09, 2007 5:40 pm Post subject:
|
|
|
I second my friend Fonik's comment. I've been using PnP Blue for a decade now, and it always turns out perfect results for me. Hell, just last week I did four different boards in one night, all to perfection, and with plenty of time for cocktails in between.
The etching is the easy part, but I sure get tired of the drilling!
Thomas Henry |
|
|
Back to top
|
|
|
shawn
Joined: Dec 13, 2005
Posts: 209
Location: savannah
|
| Posted: Fri Nov 09, 2007 7:46 pm Post subject:
|
|
|
| Randaleem wrote: |
BTW, from tests done in that group, I can tell you that a Staedler/lumocolor RED ink marker works MUCH better than a sharpie for resist duty. They tested dozens of types, and everything from wax to furniture polish looking for the best resist, and this marker won out.
|
Funny that you mention the Lumocolor Red ink markers. Those are exactly what I used in my pcb plotter printer method. I now use those to do any touch ups and I too stand by their ability to withstand etchants.
I'll have to check out the other stuff on that group. I havent read it in a while. |
|
|
Back to top
|
|
|
23isgood
Joined: Nov 18, 2006
Posts: 236
Location: San Francisco, CA bay area
Audio files: 13
|
|
|
Back to top
|
|
|
|

 Forum index » DIY Hardware and Software


