| Author |
Message |
goldenechos
Joined: Jun 06, 2007
Posts: 201
Location: Marshall, NC
Audio files: 1
|
 Posted: Thu Jan 17, 2008 11:08 am Post subject:
Power Distro PCBs Posted: Thu Jan 17, 2008 11:08 am Post subject:
Power Distro PCBs |
  |
|
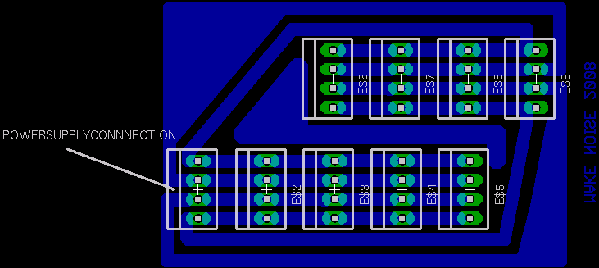
I have wanted to give something back to this community, but until last night, I had little.
Power distro boards are not too expensive ($30 from blacet), still I wanted to keep my $30, AND I NEEDED ONE NOW.
This is my first board layout, if anybody sees errors, PLEASE let me know. I have another layout that incorporated bypass caps and circuit protection diodes, however in the interest of saving time, I went with this one. It is pretty hard to plug those MTA connectords in BACKWARDS anyhow (I guess you could always build a cable backwards if you wanted to huff magic smoke)!
The nice thing about this layout is that it is a quasi-Star grounding system. If you use the connector marked for POWERSUPPLY to make connection to your supply, no module will be further then 3 module connections from GND and SUPPLY. With the Blacet supply, you can have 8 modules between GND and that last connector. As there are basically 2 busses on mine, you could perhaps even provide some isolation for a noisey module by placing it on a seperate buss.
This board is tested. I made one last night, and I have been enjoying it all morning.
The layout is ready for press n peel type etch, the image is at 300dpi
| Description: |
|
| Filesize: |
11.3 KB |
| Viewed: |
154 Time(s) |
| This image has been reduced to fit the page. Click on it to enlarge. |

|
| Description: |
| Uses .156" MTA style connectors like Blacet. |
|
| Filesize: |
9.03 KB |
| Viewed: |
150 Time(s) |
| This image has been reduced to fit the page. Click on it to enlarge. |
|
| Description: |
| At State Machine's suggestion I have added an indicator LEDs and drill markings. this board is not tested. |
|
| Filesize: |
6.96 KB |
| Viewed: |
139 Time(s) |
| This image has been reduced to fit the page. Click on it to enlarge. |

|
| Description: |
|
| Filesize: |
23.25 KB |
| Viewed: |
143 Time(s) |
| This image has been reduced to fit the page. Click on it to enlarge. |

|
Last edited by goldenechos on Thu Jan 17, 2008 1:26 pm; edited 1 time in total |
|
|
Back to top
|
|
 |
State Machine
Janitor


Joined: Apr 17, 2006
Posts: 2810
Location: New York
Audio files: 24
|
| Posted: Thu Jan 17, 2008 11:22 am Post subject:
|
|
|
Looks very nice.  May I suggest mounting holes and maybe LED indicators ? May I suggest mounting holes and maybe LED indicators ?
Bill |
|
|
Back to top
|
|
|
fluxmonkey
Joined: Jun 24, 2005
Posts: 708
Location: cleve
|
| Posted: Thu Jan 17, 2008 11:33 am Post subject:
|
|
|
similar to the layout i use, except mine's a long strip rather than folded... i suspect yrs is mechanically sturdier.
my only issue has been drilling... i don't have a nice carbide bit that big, and sometimes my regular twist drill rips up the copper enough to break the trace. easy enough to kludge when soldering, but i added 'donuts' around each hole to keep as much copper available as possible.
if anyone got it together to do a run of proffessional boards like this, bare minimum features, i'd be in for a TON.
bbob |
|
|
Back to top
|
|
|
goldenechos
Joined: Jun 06, 2007
Posts: 201
Location: Marshall, NC
Audio files: 1
|
| Posted: Thu Jan 17, 2008 1:27 pm Post subject:
|
|
|
| State Machine wrote: | Looks very nice. May I suggest mounting holes and maybe LED indicators ?
Bill |
Hey Bill, good idea. I just added those. Let me know what you think.
I have not tested this obviously, but I need to make a second board anyhow, so soon I will be testing it,
Thanx,
Tony |
|
|
Back to top
|
|
|
goldenechos
Joined: Jun 06, 2007
Posts: 201
Location: Marshall, NC
Audio files: 1
|
| Posted: Thu Jan 17, 2008 1:29 pm Post subject:
|
|
|
| bbob wrote: | similar to the layout i use, except mine's a long strip rather than folded... i suspect yrs is mechanically sturdier.
my only issue has been drilling... i don't have a nice carbide bit that big, and sometimes my regular twist drill rips up the copper enough to break the trace. easy enough to kludge when soldering, but i added 'donuts' around each hole to keep as much copper available as possible.
if anyone got it together to do a run of proffessional boards like this, bare minimum features, i'd be in for a TON.
bbob |
I bought carbide drills from a fellow on ebay selling refurbrished drills. He has tons of them, they are very inexpensive.
Tony |
|
|
Back to top
|
|
|
RF

Joined: Mar 23, 2007
Posts: 1502
Location: Northern Minnesota, USA
Audio files: 28
|
| Posted: Thu Jan 17, 2008 4:58 pm Post subject:
|
|
|
| bbob wrote: |
if anyone got it together to do a run of proffessional boards like this, bare minimum features, i'd be in for a TON.
bbob |
Me too.
bruce |
|
|
Back to top
|
|
|
Fernando

Joined: Dec 30, 2006
Posts: 286
Location: Barcelona & Emporda, Spain
|
|
|
Back to top
|
|
|
goldenechos
Joined: Jun 06, 2007
Posts: 201
Location: Marshall, NC
Audio files: 1
|
| Posted: Fri Jan 18, 2008 4:06 pm Post subject:
|
|
|
Wow, that MOTM distro board is MUCH NICER then the Blacet board and it only cost $10 more???
Well, I could make the supply inlet screw terminal type. Is anybody really interested in a run of distro boards. I would definitely be willing to do it...
I am using eagle, so it should not be hard.
Tony |
|
|
Back to top
|
|
|
Fernando
Joined: Dec 30, 2006
Posts: 286
Location: Barcelona & Emporda, Spain
|
| Posted: Fri Jan 18, 2008 4:58 pm Post subject:
|
|
|
the good thing is that it has screw terminals for both in and out
and 21 slots |
|
|
Back to top
|
|
|
numbernone
Joined: Aug 16, 2006
Posts: 477
Location: new york city
|
| Posted: Fri Jan 18, 2008 6:30 pm Post subject:
|
|
|
I second third forth a call for somebody to get some pro boards for this purpose...you wouldnt even wanna see how my power connections are made.
I imagine a minimum of hundreds would be requested in short time. |
|
|
Back to top
|
|
|
loss1234

Joined: Jul 24, 2007
Posts: 1536
Location: nyc
Audio files: 41
|
| Posted: Sat Jan 19, 2008 3:55 pm Post subject:
|
|
|
i'd be in for one. (or i could etch one i guess)
i know i could use an, ummm. safer board!! i am using a piece of stripboard set up with two buses and screw terminals on the inputs. the problem i am having is that i already have a module that needs its own bus. (CGS LFO-the leds might be the culprit)
anyway, i have been using the 3pin mta connectors, maybe using these dual ground 4 pins would help.
_________________
-------------------------------------------- check out various dan music at: http://www.myspace.com/lossnyc
http://www.myspace.com/snazelle
http://www.soundclick.com/lossnyc.htm http://www.indie911.com/dan-snazelle |
|
|
Back to top
|
|
|
State Machine
Janitor
Joined: Apr 17, 2006
Posts: 2810
Location: New York
Audio files: 24
|
| Posted: Sun Jan 20, 2008 8:40 pm Post subject:
|
|
|
| Quote: | | Hey Bill, good idea. I just added those. Let me know what you think. |
Perfect .... thanks for considering my suggestion ....
Bill |
|
|
Back to top
|
|
|
State Machine
Janitor
Joined: Apr 17, 2006
Posts: 2810
Location: New York
Audio files: 24
|
| Posted: Sun Jan 20, 2008 8:45 pm Post subject:
|
|
|
| Quote: | | Well, I could make the supply inlet screw terminal type. Is anybody really interested in a run of distro boards. I would definitely be willing to do it.. |
.
If it had terminal block inputs, filter capacitors, and indicators, yes, I would be interested I know that Eagle files are compatible with PCB Pool, they might give you a nice price for a run of boards .... I will keep my eye on this thread. If I lose track and you do a run, PM me ... OK?
Bill |
|
|
Back to top
|
|
|
bugbrand

Joined: Nov 27, 2005
Posts: 846
Location: Bristol, UK
Audio files: 1
G2 patch files: 1
|
| Posted: Mon Jan 21, 2008 5:15 am Post subject:
|
|
|
Hmmmmmm
Power distro boards would be mighty useful for me too... I'll think about whether I can do the do on this using futurlec for decent priced boards.
I'd actually be very keen to get two types - one for the 0.156" headers and one for IDC (like doepfer). Standard screw terminals at each end, caps - plus maybe protection diodes? and even power indicator LEDs?
I'd always reckon on making them long and thin rather than bunched up...
Hmmm, more thoughts?
_________________
http://www.bugbrand.co.uk
http://www.bugbrand.blogspot.com |
|
|
Back to top
|
|
|
goldenechos
Joined: Jun 06, 2007
Posts: 201
Location: Marshall, NC
Audio files: 1
|
| Posted: Mon Jan 21, 2008 5:31 am Post subject:
|
|
|
| bugbrand wrote: | Hmmmmmm
Power distro boards would be mighty useful for me too... I'll think about whether I can do the do on this using futurlec for decent priced boards.
I'd actually be very keen to get two types - one for the 0.156" headers and one for IDC (like doepfer). Standard screw terminals at each end, caps - plus maybe protection diodes? and even power indicator LEDs?
I'd always reckon on making them long and thin rather than bunched up...
Hmmm, more thoughts? |
Well, my main reason for making the distro board "bunched up" is that the FREEWARE version of EAGLE limits board size to 100 x 80 mm! Still I think the compact design is nice as it allows for greater choice in locating the power distro board AND this design incorporates the star gnd for 2 seperate busses; something that the Blacet supply board does not do...
I'll redesign with screw treminals for supply inlet.
Do you really think the caps are neccessary? Most modules have the abundance of bypass caps? And protection diodes, are those even fast enough to work on something that can supply so much current so quickly(typically people have 1A supplies connected to thtese things)?
Tony
Tony |
|
|
Back to top
|
|
|
|

 Forum index » DIY Hardware and Software

