| Author |
Message |
Groverradagast
Joined: Apr 20, 2013
Posts: 2
Location: USA
|
 Posted: Sat Apr 20, 2013 10:06 am Post subject:
Help me troubleshoot my first stripboard layout Posted: Sat Apr 20, 2013 10:06 am Post subject:
Help me troubleshoot my first stripboard layout |
  |
|
Hey Guys,
Please be gentle, this is not only my first post on EM, but it's also my first attempt at a stripboard layout. I ran across Eric Archer's "sound cameras" http://ericarcher.net/devices/sound-cameras/ and had to build one. I then found this circuit diagram:

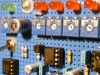
I built it on a breadboard and it worked wonderfully. The only change I made was to replace R1 with a fixed resistor. Then I drew this up in Illustrator and built it. My goal was to make it as compact as possible, as it's mounted in a small box. I could have made it easier to read by making it larger, but didn't...Forgive me if it's messy, as this is my first layout. To make it simpler to read, any wires/jumpers that connect to ground are green. Also I didn't bother labeling the components, since I already knew they worked when I tested it. The yellow blob is the ceramic capacitor (47nF). Just assume that the correct resistors are in the right places, and remember R1 is now just a resistor.

When I turn it on I get a strange descending self-oscillation that sounds like letting the air out of a balloon...I have quadruple checked for bad connections, solder bridges, and errors and can't find any between my layout and my actual board. So my conclusion is that I have made some kind of error in translating the circuit diagram into a layout. I've looked it over many times now but I need some fresh eyes.
So here's my question: Would someone be willing to check my layout for errors?
And here's the reward: If I get it working I'll go record some interesting things and post the resulting audio.
Thanks in advance,
Rob |
|
|
Back to top
|
|
 |
PHOBoS
Joined: Jan 14, 2010
Posts: 5859
Location: Moon Base
Audio files: 709
|
| Posted: Sat Apr 20, 2013 10:46 am Post subject:
Re: Help me troubleshoot my first stripboard layout |
|
|
 
| Groverradagast wrote: | | And here's the reward: If I get it working I'll go record some interesting things and post the resulting audio. |

ok,. I just started looking at it and the first thing I noticed is that pin6 of the LM386 doesn't seem to be connected.
It is in the right place though so maybe you have connected the traces but didn't draw it.
edit: nevermind I see it's normal stripboard I thought the white lines where cuts.
ok let's see if I can find something else,.. 
.
.
.
.
.
nope, the layout looks fine to me. Could be that one of the chips is dead, but they worked on breadboard, so unless you soldered
them directly on to the board it's highly unlikely, and even then chances are very small.
things to check:
orientation of components (BPW34, capacitors and IC's)
measure the voltage on the battery with and without the circuit connected (hope you have a multimeter or something else, oscilloscope would be great)
measure the voltage on the powerpins of both IC's (4-8 for U1, 4-6 for U2)
measure connections between the components. (even when solder connections look good with the naked eye they sometimes aren't)
measure for shorts
You could test if the amplifier section is working by connecting an audio signal to the potentiometer instead of the output of the LM358.
Even if you've done some of these things,.it never hurts to go over things a couple of times, the one thing you can be certain of
is that there is something wrong, 
_________________
"My perf, it's full of holes!"
http://phobos.000space.com/
SoundCloud BandCamp MixCloud Stickney Synthyards Captain Collider Twitch YouTube |
|
|
Back to top
|
|
|
Groverradagast
Joined: Apr 20, 2013
Posts: 2
Location: USA
|
| Posted: Sun Apr 21, 2013 11:10 pm Post subject:
|
|
|
Thanks for the reply PHOBoS!
It might be a few days before I get the chance to try it, but I really like the idea of attaching an audio source to the second half of the circuit! That would at least rule out that portion of the circuit as the culprit.
I'll update if I learn anything or (fingers crossed) get it working.
Cheers |
|
|
Back to top
|
|
|
|

 Forum index » DIY Hardware and Software » The layout factory


