| Author |
Message |
deltamodulator
Joined: May 18, 2016
Posts: 91
Location: Texas, USA
Audio files: 2
|
 Posted: Sun Oct 16, 2016 4:53 am Post subject:
3D printed Lunetta circuits Posted: Sun Oct 16, 2016 4:53 am Post subject:
3D printed Lunetta circuits
Subject description: Trying to figure out a way... |
  |
|
I've got an Ultimaker 2+ 3D printer. It rocks my socks off in print quality, ease of use, and print capability plus it's low noise which is important where I am. Thing is though it only prints with one filament type at a time.
Well, I want to print circuit boards and that for the most part requires two filament types in the same print - conductor (which is a poor conductor, more on that later) and insulator (which is a good insulator). So I got to thinking (which was inspired by someone else's work presented on the Ultimaker forum) about ways to do the filament swapping thing well and I came up with my take on the filament swapping approach. It has certain advantages but one major disadvantage - you have to swap the dang filament constantly! It's a pain to do that on the Ultimaker because the spool is on the BACK of the machine for some reason.
So I was left trying to think of a way to do this without swapping filament!
And I think maybe I found a way!
This is it... First I load up a conductive filament, then I print a thin sheet for the base of the circuit that is only two layers thick. This provides a mechanical base. Then I print conductors that are fairly narrow in width but really thick vertically. I print "sockets" for the chips of some special arrangement that I have in mind, and I make these be Lunetta circuits so that the comparatively low resistance of the traces is acceptable.
Anyway the result of all that is that the conductors will have resistance from trace to trace due to the bottom mechanical layer, but that will be a comparatively large resistance because the bottom layer is thin. So it's like a resistor exists from trace to trace, but it is large compared to the trace's resistance (which is also kind of large). The circuit, being a Lunetta, is mostly or entirely digital, so it won't really matter anyway!
And magically a single filament board is created. It only makes Lunettas, but it does make Lunettas! What do you all think? I will be working on making a test structure!
Les |
|
|
Back to top
|
|
 |
Wofl

Joined: Aug 22, 2013
Posts: 22
Location: South Wales
Audio files: 25
|
| Posted: Sun Oct 16, 2016 5:13 am Post subject:
|
|
|
| certainly sounds workable - i'd love to have some of my obscure lunetta ideas that never got commercialised come to fruition... |
|
|
Back to top
|
|
|
deltamodulator
Joined: May 18, 2016
Posts: 91
Location: Texas, USA
Audio files: 2
|
|
|
Back to top
|
|
|
deltamodulator
Joined: May 18, 2016
Posts: 91
Location: Texas, USA
Audio files: 2
|
|
|
Back to top
|
|
|
deltamodulator
Joined: May 18, 2016
Posts: 91
Location: Texas, USA
Audio files: 2
|
|
|
Back to top
|
|
|
Wofl
Joined: Aug 22, 2013
Posts: 22
Location: South Wales
Audio files: 25
|
| Posted: Sun Oct 16, 2016 8:13 pm Post subject:
|
|
|
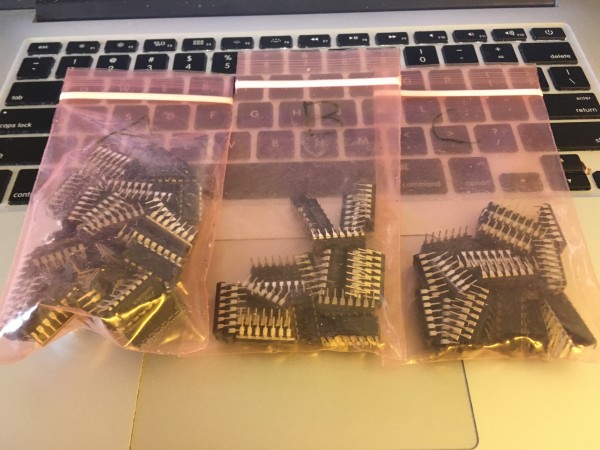
| deltamodulator wrote: | Have a look below at three bags of chips from an old Lunette "challenge", let's call it. Actually I don't remember if it was a competition or not. My plan is to use these chips and perhaps some others that I have in tubes on my desk to create some interesting (and small) Lunette circuit.
The first step is to make a model of a chip in OpenSCAD, my 3D printing CAD tool of choice. So out come the chips, out come the calipers, and away I go into my creative zone!
Les |
make sure you list the contents of the bags for those of us who want to 'play along at home'  |
|
|
Back to top
|
|
|
deltamodulator
Joined: May 18, 2016
Posts: 91
Location: Texas, USA
Audio files: 2
|
|
|
Back to top
|
|
|
deltamodulator
Joined: May 18, 2016
Posts: 91
Location: Texas, USA
Audio files: 2
|
| Posted: Mon Oct 17, 2016 5:44 am Post subject:
|
|
|
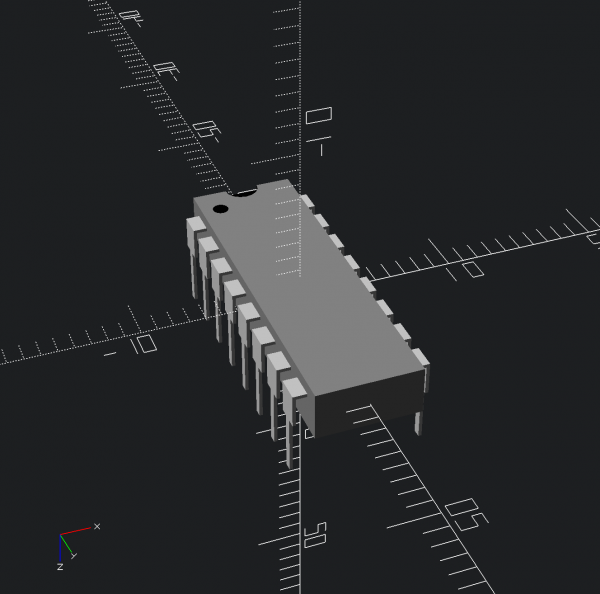
I decided to attempt a single-chip design for simplicity's sake. KISS of course. So I managed to find four 4093 CMOS chips, which have four quad Schmitt trigger NAND gates each in the first bag where I looked. Nice!
Les
| Description: |
Quad NAND in 14 Pin DIP
Featuring Schmidt Trigger (Hysteresis) |
|
| Filesize: |
72.33 KB |
| Viewed: |
542 Time(s) |
| This image has been reduced to fit the page. Click on it to enlarge. |

|
| Description: |
|
| Filesize: |
3.71 MB |
| Viewed: |
602 Time(s) |
| This image has been reduced to fit the page. Click on it to enlarge. |

|
|
|
|
Back to top
|
|
|
deltamodulator
Joined: May 18, 2016
Posts: 91
Location: Texas, USA
Audio files: 2
|
| Posted: Tue Oct 18, 2016 5:09 am Post subject:
|
|
|
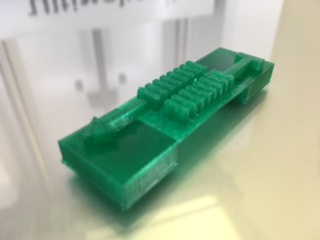
So I was trying to think of ways to connect the Schmitt trigger NAND gates together, and ways to combine the geometric with the schematic. Then it occurred to me - I wonder if I just thickened the back, then all the pins would be shorted by resistance, however the adjacent pins would have much lower resistance than those far away... what would it do?
Then I addressed the problem of how to hook up power and capacitor leads and I realized i could use the pins themselves in a breadboard.
So the resulting thing forms a "backpack" of volumetric resistance. The next thing to do is to draw some form of schematic and possibly decide where if anywhere to change thicknesses, widths, and/or make cuts in the volumetric resistance so that oscillation works better. i can also fire up the printer and print one to see what the resistances actually are.
So that's my progress report for this morning!
Les
| Description: |
| The resistive "backpack" - will it oscillate? |
|
| Filesize: |
43.41 KB |
| Viewed: |
579 Time(s) |
| This image has been reduced to fit the page. Click on it to enlarge. |

|
| Description: |
| drawing with chip in place and colored pins for clarity |
|
| Filesize: |
47.06 KB |
| Viewed: |
571 Time(s) |
| This image has been reduced to fit the page. Click on it to enlarge. |

|
|
|
|
Back to top
|
|
|
deltamodulator
Joined: May 18, 2016
Posts: 91
Location: Texas, USA
Audio files: 2
|
|
|
Back to top
|
|
|
deltamodulator
Joined: May 18, 2016
Posts: 91
Location: Texas, USA
Audio files: 2
|
|
|
Back to top
|
|
|
deltamodulator
Joined: May 18, 2016
Posts: 91
Location: Texas, USA
Audio files: 2
|
|
|
Back to top
|
|
|
deltamodulator
Joined: May 18, 2016
Posts: 91
Location: Texas, USA
Audio files: 2
|
|
|
Back to top
|
|
|
|

 Forum index » DIY Hardware and Software » Les Hall's Projects including eChucK