| Author |
Message |
cyclic

Joined: Mar 15, 2015
Posts: 95
Location: hobart
|
 Posted: Tue Aug 06, 2019 8:13 pm Post subject:
Ian Fritz EZ Chaos layout Posted: Tue Aug 06, 2019 8:13 pm Post subject:
Ian Fritz EZ Chaos layout |
  |
|
[EDITED to include final everythings]
[Edited again: nup. Not finished yet. See post below from Friday 23.8...]
Hey,
Its been a while, but I am back trying my hand at DIY builds again. In an attempt to reacquaint with EAGLE I have laid out Ian Fritz's EZ Chaos aka Double Well Chaos circuit for a single sided home etch PCB.
He has given me permission to share it here.
I HAVE NOT built it yet, and will update when I do, but thought others out there might like to check for schematic errors or pcb errors, as I've grown blind from looking at it for so long...
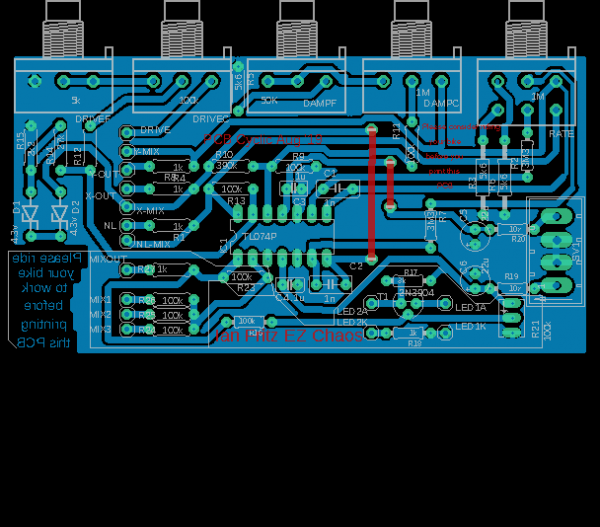
I have made the layout with on board pots, including the suggested fine tuners for Drive and Damping, so there is a row of 5 16mm pots. It is about 10x5cm in size and I have it down to 2 jumpers.
Since I hate to see an op-amp go idle I put the spare to use as a simple inverting mixer, with the plan that I have panel switches to select any or all of the X/Y/NL outputs to be mixed and inverted as an additional.
I have also included the 'Single Transistor bipolar LED driver.' See commetns below for th link to that thread.
At one point I had some kludge space but I pulled it out for some bike advocacy instead. Lets hope I don't need a kludge!
cheers
| Description: |
| screenshot of board. I'll post a etchable file once I remember how to do it! |
|
| Filesize: |
29.76 KB |
| Viewed: |
299 Time(s) |
| This image has been reduced to fit the page. Click on it to enlarge. |
|
| Description: |
|
| Filesize: |
31.26 KB |
| Viewed: |
454 Time(s) |
| This image has been reduced to fit the page. Click on it to enlarge. |
|
| Description: |
|

Download (listen) |
| Filename: |
EZChaos.TopSilk.3.pdf |
| Filesize: |
18.93 KB |
| Downloaded: |
306 Time(s) |
| Description: |
|
Download (listen) |
| Filename: |
EZChaos-BottomCopper.3.pdf |
| Filesize: |
32.22 KB |
| Downloaded: |
308 Time(s) |
| Description: |
|
Download (listen) |
| Filename: |
EZChaos.2.brd |
| Filesize: |
132.04 KB |
| Downloaded: |
315 Time(s) |
Last edited by cyclic on Fri Aug 23, 2019 6:22 am; edited 2 times in total |
|
|
Back to top
|
|
 |
cyclic
Joined: Mar 15, 2015
Posts: 95
Location: hobart
|
| Posted: Tue Aug 06, 2019 9:17 pm Post subject:
|
|
|
here are more files.
there are mirrored and unmirrored versions as I realised that the bottom copper is effectively mirrored by viewing it from above, adn the top compnents needto be mirrored.
I'm testing myself adn will use the top compnenets as a silkscreen to see how accurate I can get in prep for etching double sided boards.
Last edited by cyclic on Tue Aug 13, 2019 11:58 pm; edited 1 time in total |
|
|
Back to top
|
|
|
roglok

Joined: Aug 28, 2010
Posts: 202
Location: uptown
|
| Posted: Wed Aug 07, 2019 12:18 am Post subject:
|
|
|
| Especially for home etching you might consider a plane instead of tracks for the 0V. To provide some electrical isolation and to reduce the amount of copper to etch away... |
|
|
Back to top
|
|
|
cyclic
Joined: Mar 15, 2015
Posts: 95
Location: hobart
|
| Posted: Wed Aug 07, 2019 3:43 am Post subject:
|
|
|
Yeah thats not a bad plan. Ive also now thought about squeezing in a kludge area too as I have more than once had a little daughter board hanging off the side to drive an LED or buffer input or something. I reckon i could fit in quite a few 1x3 throughholes for that kind of shenanigans. But it does mean i need to reestablish schem to pcb connectivity....
Thanks for the idea. |
|
|
Back to top
|
|
|
Ayab
Joined: Oct 27, 2015
Posts: 186
Location: London, UK
|
| Posted: Fri Aug 09, 2019 4:50 am Post subject:
|
|
|
Hi
  
Your R14 is 27k, Ian's is R17 100K
Apart from that your schematic is identical to his plus your additional mixer which should also be fine. Also the fine tuning pots:
I have not had time to carefully check your circuit for the set up of the fine adjust pots drive and damp (at a glance I noted I should double check the grounding but am not familiar with this pot set up).
Will be excellent to see an EZ Chaos pcb. EZChaos is on my strip board list but I take so long making strip boards badly. Thank you!
(I did also trace comparatively the pcb against ian's schematic and was as above except I got a little confused with your C2 and C4 - will try to have another look). |
|
|
Back to top
|
|
|
cyclic
Joined: Mar 15, 2015
Posts: 95
Location: hobart
|
| Posted: Fri Aug 09, 2019 5:09 am Post subject:
|
|
|
Hey Ayab, thats awesome that you checked it for me. Thanks on the incorrect r value.
Ive made a change to the fine tune pot for damping. There is another Fritz chaos thread (which I was going to add this into, but couldn't find it here, but can with google) and Ian himself comments on a pot setup in that one.
Is there a way to merge the thread with te other one to keep the info together for future refernce?
Ill repost an updated schematic and layout in the next few days, hopefully I can work out how to just update the original post. I looked at it last night and decided that Id also indulge my love of blinky lights, and I have added a pair of indicators for +_ voltages on the mixer output. I figured that with an unpredictabke circuit its probably useful to be able to see as well as hear it, and since I only have space for one indicator, I chose the mixer as that way I can select an output to drive them.
When im on the laptop not my phone Ill get links for these other threads and update thr files.
Thanks heaps Ayab. |
|
|
Back to top
|
|
|
Ayab
Joined: Oct 27, 2015
Posts: 186
Location: London, UK
|
| Posted: Fri Aug 09, 2019 5:54 am Post subject:
|
|
|
Hi cyclic
Your hard work is appreciated - and for just helping to check is a pleasure!
I do remember an Ian Fritz suggestion for fine tuning pots.
Great choice of circuit and I really like your design of adding the mixer and fine tune pots - hope you don't misunderstand me I only meant I have a deadline before the week ends so can't look yet.
Will definitely be etching one but will not be able to for couple of weeks.
Btw think you would have to ask a moderator about merging threads.
Last edited by Ayab on Fri Aug 09, 2019 10:15 am; edited 1 time in total |
|
|
Back to top
|
|
|
Ayab
Joined: Oct 27, 2015
Posts: 186
Location: London, UK
|
|
|
Back to top
|
|
|
gabbagabi

Joined: Nov 29, 2008
Posts: 652
Location: Berlin by n8
Audio files: 23
|
| Posted: Sat Aug 10, 2019 2:03 am Post subject:
|
|
|
i wanted to play around with your eagle files
but your eagle files dosent match somehow:
there is
ezchaos1_181.brd
and
ezchaos1_284.sch
cu,bb |
|
|
Back to top
|
|
|
blue hell
Site Admin

Joined: Apr 03, 2004
Posts: 24419
Location: The Netherlands, Enschede
Audio files: 297
G2 patch files: 320
|
| Posted: Sat Aug 10, 2019 7:49 am Post subject:
|
|
|
the _xyz numbers are randomly added by the forum software to avoid having files on the system with the same name .. you can just delete that postfix from the name.
_________________
Jan
also .. could someone please turn down the thermostat a bit.
 |
|
|
Back to top
|
|
|
cyclic
Joined: Mar 15, 2015
Posts: 95
Location: hobart
|
| Posted: Sat Aug 10, 2019 9:33 pm Post subject:
|
|
|
Yes, that is the fine tune i have now.implemented. it made a bit of a rejig so i have redone the board, but not.uploaded yet as.its a bit messy and.I want to tidy it first.
I use bananas so I wont be normalling, but you could. Im going to have manual switches so I can select
I breadboarded the indicator leds circuit last night and its.good.enough but not perfect. If you search for 'A collection of Led drivers' here, it is.the single transistor bipolar driver. Putting it on the board has messed it up a bit so I want to make it neat and tidy before updating. Give me a few daysn i have 3 kids and other hobbies!
It sounds like the current pcb shiuld work fine, but my new one has more features (which are all optional) and i eliminated a jumper too. Yay! So if you can wait, do that...
Ill probably also bung in some 1x3 kludge pads as a just in case measure...
Cheers |
|
|
Back to top
|
|
|
cyclic
Joined: Mar 15, 2015
Posts: 95
Location: hobart
|
| Posted: Sat Aug 10, 2019 9:36 pm Post subject:
|
|
|
| gabbagabi wrote: | i wanted to play around with your eagle files
but your eagle files dosent match somehow:
there is
ezchaos1_181.brd
and
ezchaos1_284.sch
cu,bb |
Yeah, look im a total newbie at eagle so i dont even know if i uploaded all the files you need. Therr are a gazillion in the project folder.. |
|
|
Back to top
|
|
|
gabbagabi
Joined: Nov 29, 2008
Posts: 652
Location: Berlin by n8
Audio files: 23
|
| Posted: Sun Aug 11, 2019 2:49 am Post subject:
|
|
|
all fine,
Jan (BlueHell) has already given us the answer to the naming-problem
edit: but ive tried to rename them and i get always the Anotation-Error
some things:
does the PCB has to be single-sided (for home etching)? or do you plan to send this to a BoardHouse (where it could be double sided)?
the power connector: you using two pins for GND, i guess standard would be 3 PIN for gnd, or maybe better go for the "full" connector 2x7pin as the board is big enough? |
|
|
Back to top
|
|
|
cyclic
Joined: Mar 15, 2015
Posts: 95
Location: hobart
|
| Posted: Sun Aug 11, 2019 3:41 am Post subject:
|
|
|
| gabbagabi wrote: | all fine,
Jan (BlueHell) has already given us the answer to the naming-problem
some things:
does the PCB has to be single-sided (for home etching)? or do you plan to send this to a BoardHouse (where it could be double sided)?
the power connector: you using two pins for GND, i guess standard would be 3 PIN for gnd, or maybe better go for the "full" connector 2x7pin as the board is big enough? |
Yeah thats a good point about power, but: My entire synth is DIY so ive never worried about conforming to every standard and the eurorack power connectors seem completely overblown to me. Like really, why do i need a 14 pin connector?
I used 3 pins in total (ie 12v, gnd, -12v) at first but then settled on 4 so I can have an analog and digital ground if occassinally needed. I guess i could have put the leds on my DGnd for this, but i dont think its necessary. Why is 3 pins for gnd a standard?
Thats not a hard fix so I can do that. m going to do the ground pour on this i reckon anyway
I have seen a combo eurorack\MOTM power conn, they are on the barton musical instruments pcbs. I have If this was available as an eagle cad file which was easy to install i could do that but its a very low priority for me to create my own.
Ive made it single sided for home etching because thats what I do. I am moving towards making double sided boards and thats why i am making a.silkscreen so I can practice top and bottom alignment. If I get ok at doublesided then I might get something done professionally in future but Im in no rush. |
|
|
Back to top
|
|
|
cyclic
Joined: Mar 15, 2015
Posts: 95
Location: hobart
|
| Posted: Sun Aug 11, 2019 5:57 am Post subject:
|
|
|
AAAAAAlllllll Righty then.
Here is a bunch of files which I am considering ready for prototype production.
It is a single sided PCB for home etch.
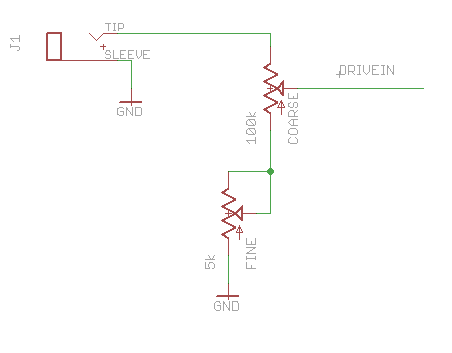
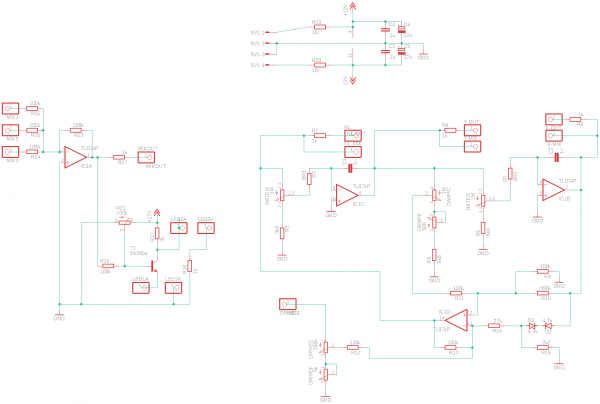
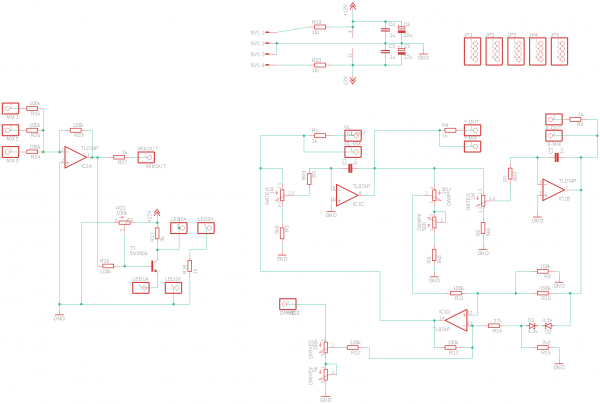
Main circuit: Ian Fritz's EZ Chaos, AKA Double Well Chaos from the schematic available on synthcube and reproduced here with Ian's permission. I have included the recommended fine tune pots on board, for a linear array of 5 pots to double as PCB mounting. Because I like that.
Sub circuits:
- An inverting mixer for all outputs, to be selected via 3 panel switches so I can choose any combination of outputs, inverted.
- A pair of LEDs for bipolar indication of the *MIXER* outputs, based on the 'Single Transistor Bipolar LED Driver' contained in the "A Collection of LED Drivers' thread here on EM (http://electro-music.com/forum/topic-49449.html)
- A bunch of pads to 1.make use of space and 2.allow for kludge space in case I scrwe anything up...
All these subcircuits are delineated on the silkscreen so you can choose to include them if you want, and its easy to ID where they are. They are entirely optional, but I'd at least put a bridge across the spare op-amp if it is not used as a mixer.
I went with large 4-pin power because that what I wanted.
You can take the files and do whatever you want with them except make money.
| Description: |
| the full thing. I went with a ground plane even though I'm not convinced that this really IS a 'ground plane' vs a 'ground pour' in terms of actual electrical effect. But it does mean less copper to etch |
|
| Filesize: |
31.04 KB |
| Viewed: |
285 Time(s) |
| This image has been reduced to fit the page. Click on it to enlarge. |
|
| Description: |
| the important electrical bits |
|
| Filesize: |
32.2 KB |
| Viewed: |
288 Time(s) |
| This image has been reduced to fit the page. Click on it to enlarge. |
|
| Description: |
|
Download (listen) |
| Filename: |
EZChaos.TopSilk.2.pdf |
| Filesize: |
29.96 KB |
| Downloaded: |
265 Time(s) |
| Description: |
|
Download (listen) |
| Filename: |
EZChaos.2.brd |
| Filesize: |
134.84 KB |
| Downloaded: |
278 Time(s) |
| Description: |
| mirrored for toner-transfer etc. |
|
Download (listen) |
| Filename: |
EZChaos-BottomCopper.2.pdf |
| Filesize: |
31.85 KB |
| Downloaded: |
275 Time(s) |
|
|
|
Back to top
|
|
|
AlanP
Joined: Mar 11, 2014
Posts: 746
Location: New Zealand
Audio files: 41
|
| Posted: Sun Aug 11, 2019 6:40 am Post subject:
|
|
|
| Once you've built this, an oscilloscope that can do XY mode is what you want, as Ian's chaos circuits are not pre-tuned, like the NLC Sloth is. |
|
|
Back to top
|
|
|
cyclic
Joined: Mar 15, 2015
Posts: 95
Location: hobart
|
| Posted: Sun Aug 11, 2019 4:41 pm Post subject:
|
|
|
| AlanP wrote: | | Once you've built this, an oscilloscope that can do XY mode is what you want, as Ian's chaos circuits are not pre-tuned, like the NLC Sloth is. |
Yep I have one of those as i do understand that this circuit doesnt always hit chaotic oscillations. Thats why I included the led indicators. Im hoping that I can use the Dso in xy to learn initially and see what various chaos forms look like via a simple 2 led indicator, and then just use the leds afterwards when wiggling.
Clearly not as good, but I do bike synth mash noise event and Im not taking my dso along for that! |
|
|
Back to top
|
|
|
cyclic
Joined: Mar 15, 2015
Posts: 95
Location: hobart
|
| Posted: Mon Aug 12, 2019 7:23 pm Post subject:
|
|
|
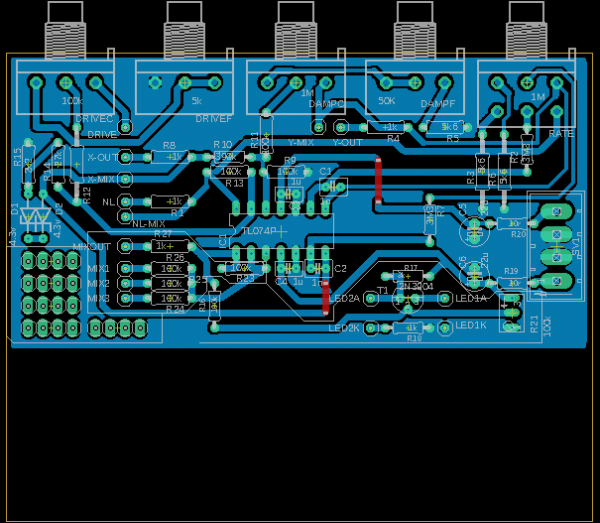
Ok, so I etched the abbove board last night. Its ok but I think the pads are too small. So I went back and redid them and also realised I could swap the fine and coarse pots and yadayadaya...
I will probably just use the one I have, but since I mucked about with it and its now even better (i was enjoying the routing challenge\process) I will update the boards and trace layouts etc for future use by others.
So, Ayab, hold off on printing and etching until I out up the next version! |
|
|
Back to top
|
|
|
cyclic
Joined: Mar 15, 2015
Posts: 95
Location: hobart
|
| Posted: Wed Aug 14, 2019 12:01 am Post subject:
|
|
|
OK!
I have finished. I'm not doign any more now.
The finals files - all that should be required - are now in the ORIGINAL POST and are 'version 3'
I left the 'version 2' ones up as well, but I reckon 3 is better (obviously!) but 2 has the kludge space but tiny pads.
I'm not even sure if I will etch V3 myself - I will attempt to use v2 which I have etched but had the tiny pads and will only re-etch if I either fail or its so freaken awesome I need two of them... |
|
|
Back to top
|
|
|
Ayab
Joined: Oct 27, 2015
Posts: 186
Location: London, UK
|
| Posted: Fri Aug 16, 2019 2:56 pm Post subject:
|
|
|
Cyclic - Thank you very much again - that is really great  |
|
|
Back to top
|
|
|
cyclic
Joined: Mar 15, 2015
Posts: 95
Location: hobart
|
| Posted: Fri Aug 23, 2019 6:21 am Post subject:
|
|
|
Ok.
So ive built the #2 version above which I etched last week and this is what I have to say so far:
Yep, chaos when you get the right spots. At least I got that far (after eliminatig an invisible solder bridge somewhere and cursing late into the night yesterday)
Um. Er. I drew most of the pots in backwards. Whoops.
I can see that 10turn pots will actually be way better. So I bought 2 of them with the fancy knobs for $10 on ebay. Sure they wont be Bourns but they will better...
The Led is useless. I had problems on the breadboard but just whacked it in there to use some space up. Waste of time as currently drawn.
I have also since realised that the Cha half of the ChaQuo is actually an improved version of the EXChaos which, ahem, uses all 4 opamps. Since the mixer is just there to use an opamp, but the improved version is, well, improved, I may as well just ditch the mixer too and add.the extra gain control to hopefully get slightly better or easier to dial in chaos.
Yay for learning! |
|
|
Back to top
|
|
|
cyclic
Joined: Mar 15, 2015
Posts: 95
Location: hobart
|
| Posted: Tue Feb 16, 2021 5:29 pm Post subject:
|
|
|
So 18/12 later I have another update...
I laid out the Cha of the ChaQuo and used multiturn pots because to be honest, the coarse/fine dual knobbage just isnt anywhere near as good as a multiturn.
I used really shit cheap mutliturns and it turns out (bwahahahah!) that one of them was dodgy and I didnt realise that until, ahem, yesterday.
I had thought for the last 12/12 that my layout was bad and htats why all I ever got was a few options of weird LFO.
Now that I have fixed my crap pot by hot gluing it all back together it seems to be working properly, so it seems that after all it might be worth while posting it here.
So I'll post the schem and board files again in the next few days once I get around to it and check that the ones I have on file are the one I etched.
Once again, I put the on board pots in backwards. Sorry I cant be arsed fixing it now, I just live with the fact that my chaos is also backwards. |
|
|
Back to top
|
|
|
Ayab
Joined: Oct 27, 2015
Posts: 186
Location: London, UK
|
| Posted: Wed Feb 17, 2021 12:20 am Post subject:
|
|
|
Hi Cyclic
Great that it is all tested and working. You are the man 
Good work. Thank you. I will get etching as soon as I have a diy space again - (should not be be too long before I sort out that type of chaos).
Couple of queries:
- Can I just solder the pots to the other side of the board (as long as there is plenty of solder should be ok, no?) to reverse them?
- The .brd eagle file seems to be in text format am not sure how to download it (probably use the other version anyway.
(And btw have been always been a very keen cyclist is my main form of transport here in London and I like to stick it on train when go places). |
|
|
Back to top
|
|
|
|

 Forum index » DIY Hardware and Software