Joined: Nov 10, 2011 Posts: 878 Location: Lancashire, England
Audio files: 14
Posted: Sun May 27, 2012 6:50 am Post subject:
nathanxl wrote:
Thanks JJ
At the moment these modules are used to drive the plectrum motors for the 8string Lunetta Guitar. As they are they only sequence gates for motors and are not used to produce sounds themselves. Next step is to build sound modules that are controlled by the same 8Bit Cipher Gate Sequencer. Will put up sounds here when that eventuates.
Completely coincidentally I came accross a video of your device on youtube in the associated videos on a synth video
Looks really unique and interesting sound isn't bad either, but it seemed a bit quiet because of the lack of a sounding chamber, perhaps you plan to remedy this? _________________ As a mad scientist I am ruled by the dictum of science: "I could be wrong about this but lets find out"
Thankyou all so much for the kind words of support.
Being locked away in my workshop without anyone else around to see these things, its great that I am able to find other people interested in the same things as me.
Firstly JingleJoes query about the quietness of the string resonance. There are multiple reasons for this, some will be rectified. I basically designed the Lunetta Guitar to be electric rather than acoustic although it would be easy to affix a resonant chambers under the bridges. The Magnetic pickups I made are not as sensitive as I would have liked but there are ways around this. As the strings are bass strings they require more plectrum power so am thinking of switching over to more powerful servo motors and converting the gate into a powerful trigger.
I did a live performance with this instrument last week and it went well but it would have been better if I got more movement out of the strings, thus a hotter signal into the effects pedals. A few of the other things I realized while performing with it was that the super bright LEDs were SUPER bright and it would be nice to have actual Lunetta synth sounds directly related to the string sequencing to play around with on the fly.
So I have made this module to remedy some of the current issues, many more will follow of coarse. As this is a freeform sculpture thread I wont clutter and make this post any longer by explaining its function but for those interested the info is written in the youtube page:
http://youtu.be/ZBLqT6yaUrQ
Lunetta Guitar Module LFO LDRO1.JPG
Description:
Filesize:
1.45 MB
Viewed:
587 Time(s)
This image has been reduced to fit the page. Click on it to enlarge.
Lunetta Guitar Module LFO LDRO2.JPG
Description:
Filesize:
1.51 MB
Viewed:
597 Time(s)
This image has been reduced to fit the page. Click on it to enlarge.
Lunetta Guitar Module LFO LDRO3.JPG
Description:
Filesize:
1.55 MB
Viewed:
585 Time(s)
This image has been reduced to fit the page. Click on it to enlarge.
Lunetta Guitar Module LFO LDRO4.JPG
Description:
Filesize:
1.18 MB
Viewed:
568 Time(s)
This image has been reduced to fit the page. Click on it to enlarge.
Lunetta Guitar Module LFO LDRO5.JPG
Description:
Filesize:
1.24 MB
Viewed:
541 Time(s)
This image has been reduced to fit the page. Click on it to enlarge.
Joined: Nov 10, 2011 Posts: 878 Location: Lancashire, England
Audio files: 14
Posted: Fri Jun 01, 2012 4:10 pm Post subject:
That both looks and sounds fucking brilliant
Excellent work! The LDR control you implemented works very well _________________ As a mad scientist I am ruled by the dictum of science: "I could be wrong about this but lets find out"
Wow, those are wonderful little works of art! Interesting that you didn't isolate the LDRs from ambient light, as is common to do. Yet they seem to work fine... perhaps those lovely lenses help.
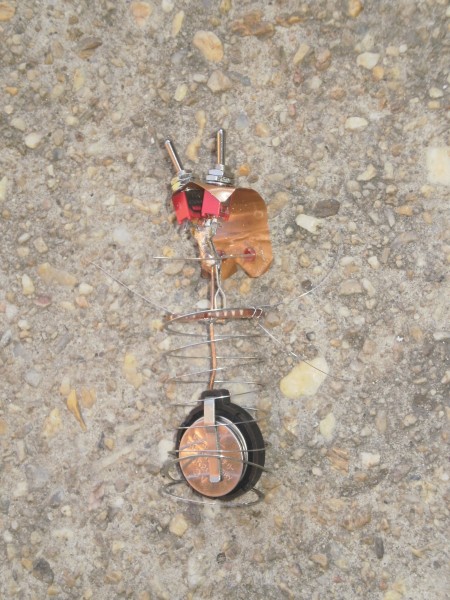
I thought I'd share this here, even though it is not exactly a Lunetta, as it could become one, and shows some similar construction ideas.
I started it one night on a whim. Why? Not sure. I work on it at night when I need some time out from other things. So it's nowhere near finished yet. Maybe people will appreciate seeing the process. Besides that, I have no idea when it would be finished. And I was photographing another thing anyway.
At this stage I plan on making it a kind of electronic satyr. It's definitely more of a sculpture than a lunetta, so I do take liberties with the construction ethos. (to me, pure air wired electronics should only be held together with solder) I'm allowing super-glue (cynoacrylate), contact glue, and I've even started "sewing" parts together with 32 gauge wire!
This is so I can incorporate more aesthetic features, which are important in representing the right structure. Components, and solder are, however, my preffered M.O.
I'll leave more detailed descriptions until anyone asks detailed questions, which are welcome.
Picture 020.jpg
Description:
Filesize:
740.3 KB
Viewed:
469 Time(s)
This image has been reduced to fit the page. Click on it to enlarge.
Picture 017.jpg
Description:
Filesize:
879.23 KB
Viewed:
461 Time(s)
This image has been reduced to fit the page. Click on it to enlarge.
_________________ What makes a space ours, is what we put there, and what we do there.
The creator hasn't bestowed a function on this little critter yet.
It will have CMOS driven eye and heart LEDs, and then I think I'll incorporate a sound of some kind, seeing as how this a Lunetta thread. But it doesn't have a piezo at this stage. _________________ What makes a space ours, is what we put there, and what we do there.
Joined: Nov 10, 2011 Posts: 878 Location: Lancashire, England
Audio files: 14
Posted: Thu Jun 07, 2012 4:52 am Post subject:
For a second I thought that was a miniature spring-reverb robot _________________ As a mad scientist I am ruled by the dictum of science: "I could be wrong about this but lets find out"
The brown section is a piece of stripboard which has +V and Gnd connections on it. Structurally, it will hold the shoulder points, which will transfer through smaller stripboards for limb joints,.........I think.
I want the larger components which make up the limbs to be functional, but stripboard can easily get weak, when the copper pads lift off the substrata. This needs to be a bit stronger than that, but I am goin to traverse these components with solid copper to make the circuit. May be that would be strong enough? Any ideas?
The disc at the base is a battery holder, designed for a 2032, but I put in 2* 2016s. You do know that the last two digits tell you the thickness in mm?
This will give me 6V to play with on the CMOS chips. Good for driving the LEDs, and I think I could drive a small piezo from the CMOS directly as well.
Is this sound thinking? _________________ What makes a space ours, is what we put there, and what we do there.
Should I ask Jan to shift all of my stuff to a different thread? I don't want to hijack anything. _________________ What makes a space ours, is what we put there, and what we do there.
It distinctly is Lunetta freeforming in a sculptural sense you are doing so I think it should stay here.
Solid copper is the way to go I think... At themoment Im looking for a cheap source for 3-4mm brass rod.
I get all of that kind of stuff from HobbyCo in Sydney. I'm sure you'd have a similar hobby supplier nearby. They are also great for thin ply and other supplies if you're into this kind of stuff. _________________ What makes a space ours, is what we put there, and what we do there.
Joined: Nov 10, 2011 Posts: 878 Location: Lancashire, England
Audio files: 14
Posted: Thu Jun 07, 2012 9:12 am Post subject:
If you want to make a stronger connection to stripboard put the component through the hole as normal, then feed the lead back through the hole next to it on the same row, and wrap it around the bit of component wire poking out on the component side of the board, solder liberally.
This is how I made test points and power connections on older boards I made _________________ As a mad scientist I am ruled by the dictum of science: "I could be wrong about this but lets find out"
Hey dudicles!
Guess what I found today when I went looking for parts for the "goatman".
These are all NOS from an old guy who used to work TTL and CMOS boards from the 70s. He probably kept them, unused, because his own work was way beyond tagstrips.
These things are what the original TV sets had all through the guts of them. One of my worst snaps from the 240VAC viper was playing with this sort of stuff!!
Anyway,... I digress.
P6080094.JPG
Description:
Filesize:
767.83 KB
Viewed:
338 Time(s)
This image has been reduced to fit the page. Click on it to enlarge.
_________________ What makes a space ours, is what we put there, and what we do there.
Of course, what I was trying to say was that this stuff is beautiful for air wired sculptures. Structural integrity, with multiple isolated tags, which, on mine, are all pre-tinned!
You just match up pairs (they can easily be reversed) to build symetrical systems. _________________ What makes a space ours, is what we put there, and what we do there.
Joined: Nov 10, 2011 Posts: 878 Location: Lancashire, England
Audio files: 14
Posted: Fri Jun 08, 2012 7:18 am Post subject:
I've got a long one of them from an old valve radio, festooned with components, it looks like a spine with electronic-component ribs _________________ As a mad scientist I am ruled by the dictum of science: "I could be wrong about this but lets find out"
Joined: Nov 10, 2011 Posts: 878 Location: Lancashire, England
Audio files: 14
Posted: Fri Jun 08, 2012 12:40 pm Post subject:
hahahaha wonderful, I've got to get in on this, brb. _________________ As a mad scientist I am ruled by the dictum of science: "I could be wrong about this but lets find out"
You cannot post new topics in this forum You cannot reply to topics in this forum You cannot edit your posts in this forum You cannot delete your posts in this forum You cannot vote in polls in this forum You cannot attach files in this forum You can download files in this forum

 Forum index » DIY Hardware and Software » Lunettas - circuits inspired by Stanley Lunetta